Rapise Installation Guide
Introduction
Rapise® is a next-generation software test automation tool that leverages the power of open architecture to improve application quality and reduce time to market.
This installation guide outlines how to set up a working installation of Rapise, including the installation of any dependencies and prerequisites. It also provides information on obtaining an evaluation or production license key from Inflectra so that you can use the software.
It assumes a basic understanding of how to set up and administer a Windows® workstation, and also assumes that you have access to a valid administrator-level account that can install software.
For information on how to use the features of Rapise, please refer to either the Rapise Quick Start Guide or the Rapise User's Guide instead.
Installing Rapise
This section outlines how to prepare your system for the installation of Rapise, and how to install the software using the provided installation package.
The first sub-section will outline what hardware and software configurations are supported and the exact installation sequence for different versions of Microsoft® Windows®. The second sub-section will explain how to load the Rapise software onto the computer and discuss common problems and solutions.
The minimum hardware and software requirements for running Rapise are:
| Requirement | Minimum Specification |
|---|---|
| Processor: | Intel® or AMD® multi-core processor (i3/i5/i7/Ryzen or better) |
| Memory: | 8 GB minimum, 16 GB+ recommended |
| Disk Space: | 128 GB minimum (Solid State Drive / SSD highly recommended) |
| Display: | HD (1280 x 720) minimum, FHD (1920 x 1080) recommended |
| Operating System: | Microsoft Windows 11 (x64) |
| Microsoft Windows Server 2019, 2022, 2025 | |
| Web Browsers: | Google Chrome |
| Microsoft Edge | |
| Mozilla Firefox | |
| Apple Safari | |
| Legacy support: Internet Explorer 11 | |
| Other Components: | .NET Framework 4.8 (or later) |
System Prerequisites
Assuming that you have already installed the appropriate version of Microsoft Windows onto your computer (or that it has been pre-installed for you), you then need to make sure that the various prerequisites have been correctly added to your installation before trying to install Rapise. The Rapise installer will check to ensure that the various prerequisites are in place and will install any missing prerequisites (apart from the Microsoft .NET Framework) automatically.
.NET Framework 4.8
On all supported operating systems (Windows 11, Windows Server 2019, 2022, and 2025), the Microsoft .NET Framework 4.8 is typically included by default and meets the minimum requirements.
If you are using a custom Windows environment or need to repair your installation, you can download the .NET 4.8 installer manually. To do this, open your web browser and navigate to:
https://dotnet.microsoft.com/en-us/download/dotnet-framework/net48
Remove any Previous Versions
Before installing the current version of Rapise, we recommend first uninstalling any previous versions of Rapise to ensure you have a clean installation. To do this, go to Start > Control Panel > Programs and Features:
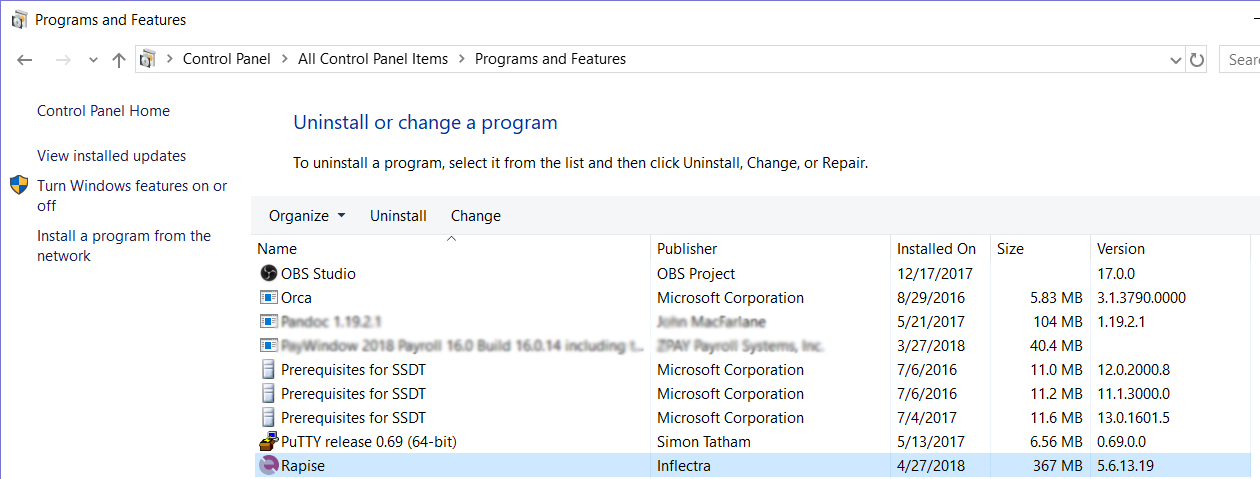
Then click the "Rapise" entry and confirm that you want to uninstall the existing version.
Installing the Software
Now that all the prerequisites have been correctly installed, you are ready to install Rapise on your system. To perform the installation, you will need the installation package downloaded from the Inflectra® website.
To start the installation, double-click on the Rapise installation package (it will have a filename of the form Rapise-vX.X.X.X.exe), and the Windows Installer will display the following dialog box:
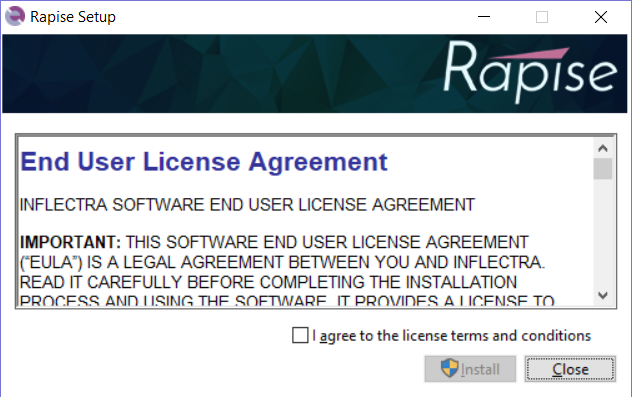
The first screen in the installation wizard outlines the Inflectra End User License Agreement (EULA). Please read this carefully as it describes the legal contract between you -- the user of the software -- and Inflectra® Corporation, the developer and publisher. Once you have read the agreement and understood your rights and obligations, select the checkbox marked "I agree to the license terms and conditions" and click the Install button.
This will begin the process of installing Rapise onto your system. If you are installing Rapise onto Windows Vista or newer, you may be prompted by the Windows User Access Control (UAC) security system to confirm that you want to install a new piece of software:
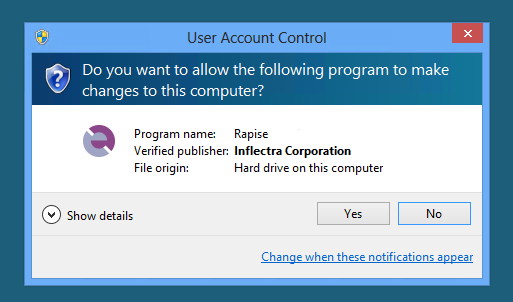
Click the option that confirms you want to proceed with the installation.
The installer will then display a progress bar that gradually fills as the installation proceeds. Once the installation is complete, the following message will be displayed:
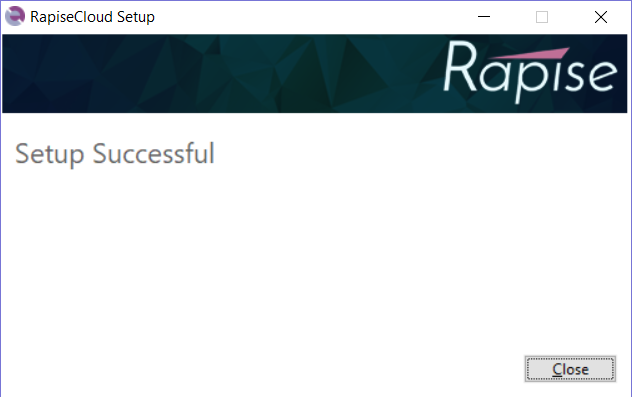
Congratulations! You have successfully installed Rapise onto your system.
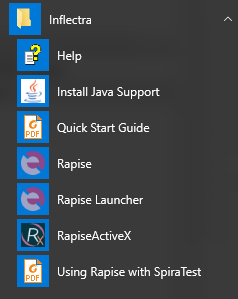
You should now have a Rapise shortcut icon added to your Windows Desktop, and if you click on Start > Program Files > Inflectra > Rapise, you should see the new Rapise program group:
License
As we announced back in June 2021, there have been plans to provide our Rapise test automation platform with a new floating license option, in addition to the fixed licensing system that we've had since the launch of the product. We are pleased to announce that you can now purchase Rapise floating licenses as part of your existing Spira subscription, with both monthly and annual options.
Floating License
How to Purchase
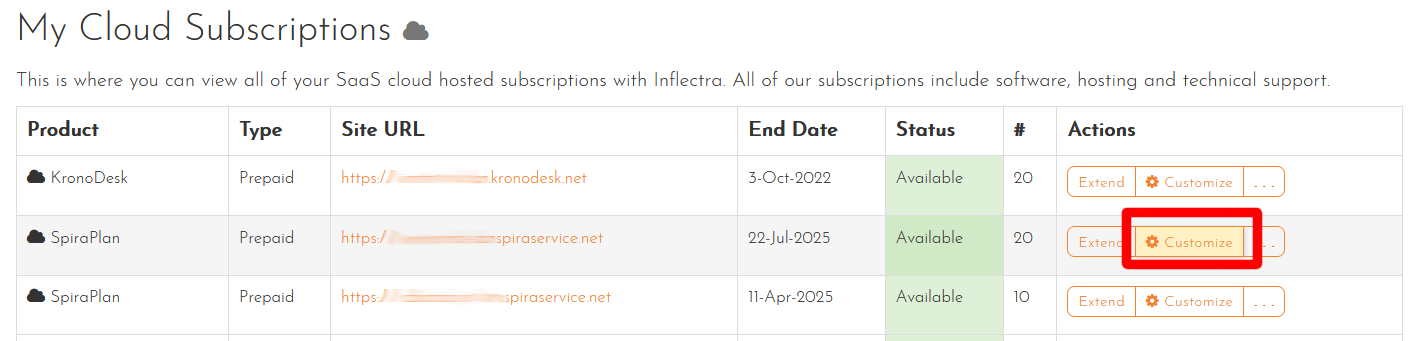
Unlike fixed licenses, which are purchased from our website as a standalone purchase, Rapise uses our Spira test management platform to manage its floating licenses. You will need to first log in to the Customer Portal on our website. From here, you need to locate your SpiraTest, SpiraTeam, or SpiraPlan cloud subscription and click the Customize button:
(If you are not using the cloud version of Spira, then unfortunately at this time, you cannot use floating licenses.)
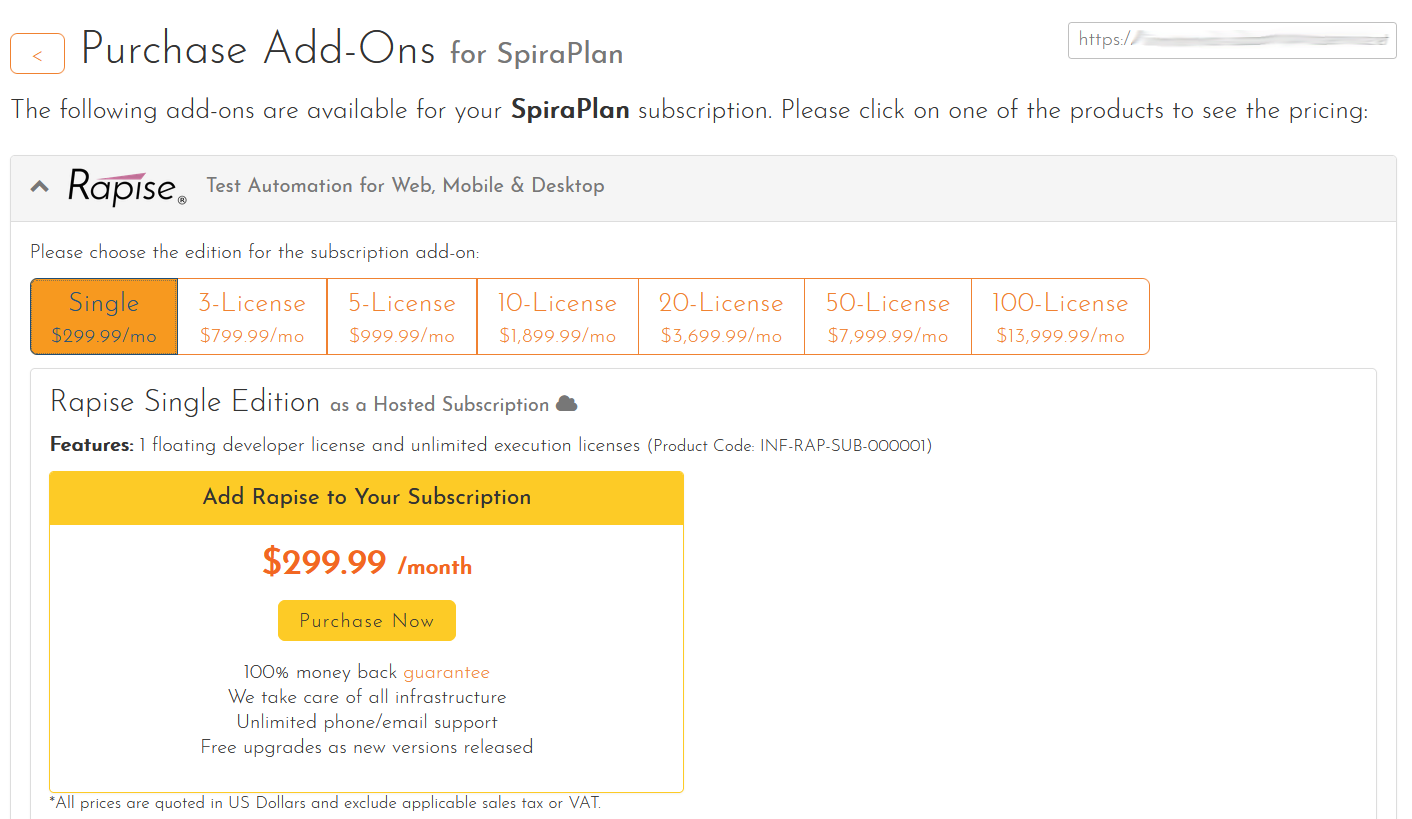
Once you click the Customize button, you can choose the number of Rapise floating licenses you want to purchase:
If you have a monthly Spira subscription, the Rapise floating licenses will also be charged monthly, whereas if you have an annual Spira subscription, the Rapise floating licenses will similarly be part of the annual renewal. Once you have completed the purchase of the floating licenses, you will see a new Rapise subscription add-on on your Customer Area homepage:

It will initially be in the Pending status while our cloud servers complete the task of updating your Spira instance with the number of Rapise licenses. Once that task is completed, you will receive an email notification, and the status will change to Active.

How to Manage
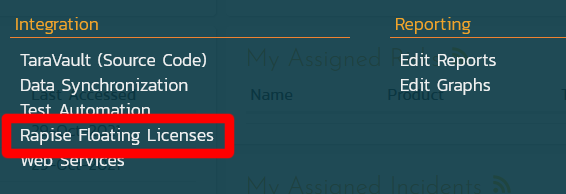
Once the subscription add-on has been provisioned, you will see a new menu entry in the System Administration: Integration section of your Spira instance:
When you click this link, you will see how many Rapise floating licenses are available as well as how many are currently in use (initially, the list will be empty):

You can now connect Rapise to your Spira instance to use the new floating licenses.
How to Configure
Now that you have floating licenses available, connect Rapise to Spira as you normally would to start writing tests:
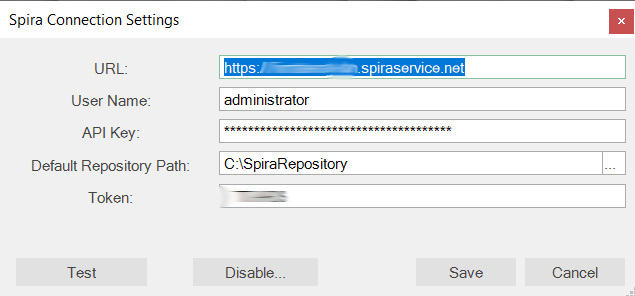
To get your API Key, follow these steps.
Rapise automatically requests a floating license from Spira and will use that license until Rapise is closed or an administrator clicks the End Session button in Spira:

The advantage of floating licenses is that you can install Rapise on all your computers, and they will only consume a license when Rapise is active. This contrasts with fixed licenses, which require you to purchase a license for each machine, regardless of whether that machine is actively using it. In addition, it lets you purchase Rapise licenses monthly, bundled with your existing Spira subscription.
Fixed License
Once you have successfully installed Rapise, you will need to activate it with a license key (either a temporary evaluation key or a permanent production key). This section describes the process for activating your copy of Rapise as well as how to update the license key and potentially move it to another computer.
Getting Your Activation Code
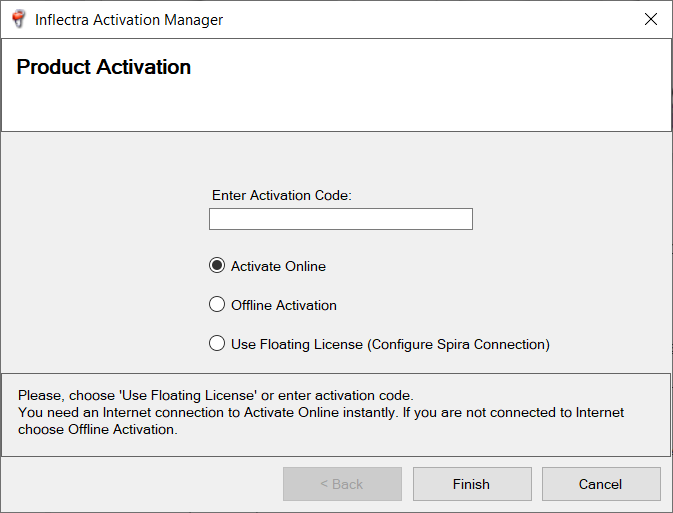
When you first launch Rapise after installation, it will display the following dialog box:
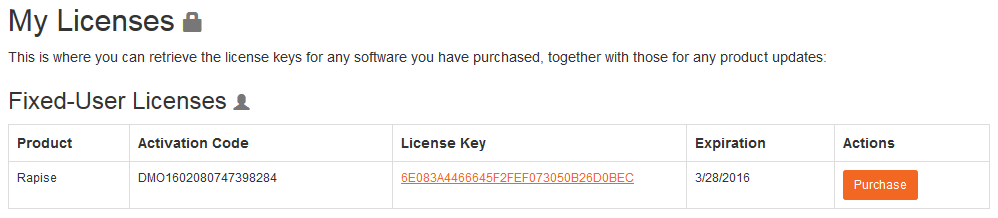
You should now enter the alphanumeric activation code from the Customer Area of the Inflectra website (the same page that you downloaded the installation package from). It will be displayed in the My Licenses section of the webpage. An example page is shown below:
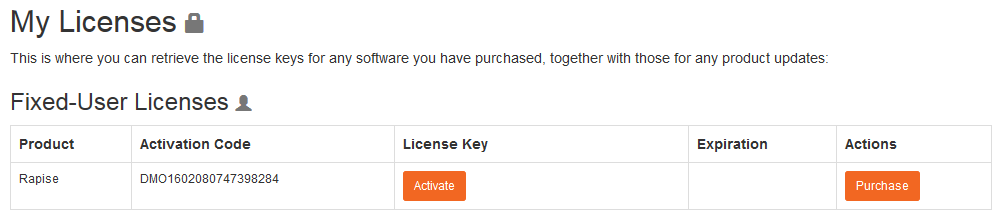
There are two kinds of activation codes:
- Evaluation Activation Codes -- these start with the letters DMO
- Production Activation Codes -- these start with the letters SDM
You should enter the appropriate activation code into the Rapise activation wizard and choose the option to either activate online or offline. If you are connected to the Internet, online activation is easier. If you are not connected to the Internet (e.g., working in a secure environment), you will need to use the offline activation option.
The following sections will explain how each of the options works:
Activating Online
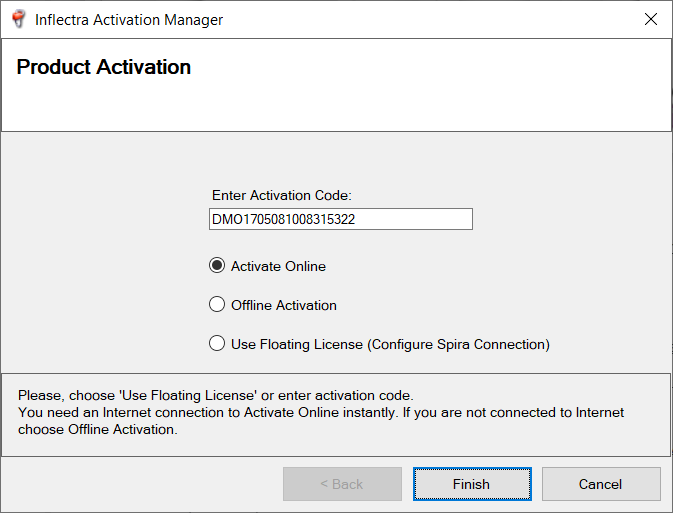
To use online activation, make sure you are connected to the Internet, enter the activation code, choose Activate Online, and click the Finish button:
The activation system will contact our activation server, process the activation code, and activate the license. The application will start automatically, and if you visit the Customer Area of our website, you will see that it is listed as activated, with a license key displayed:
Activating Offline
To use offline activation, enter the activation code, choose Activate Offline, and click the Next button:

This will bring up the Offline Activation screen:
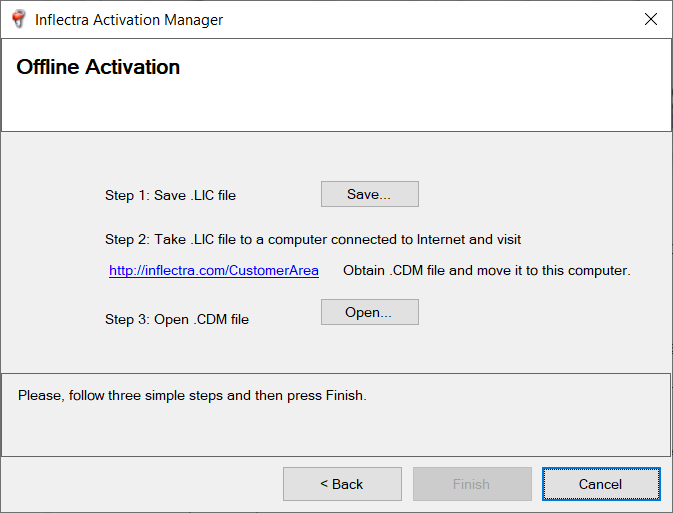
Click the Save button to save the Rapise.LIC file to your hard drive.
Copy the Rapise.LIC file to a computer that has Internet access and open the Customer Area of our website:
Click the Activate link, which will take you to the Offline Activation part of our website:
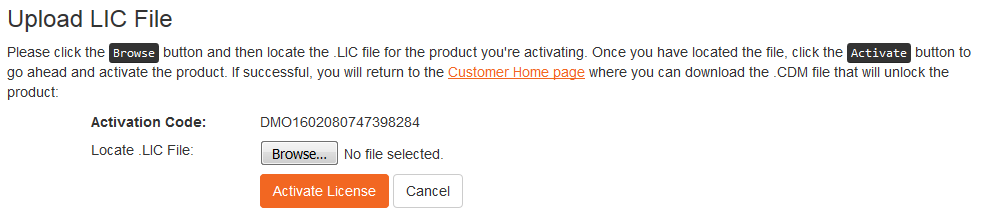
Click the Browse button and navigate to the place where the Rapise.LIC file is stored. Then click the Activate button to begin the activation process. Assuming that the license file is valid, the website will activate the license and take you back to the Customer Area, where the license key will be displayed:
Click the License Key hyperlink and you will be prompted to save the Rapise.CDM file to your hard drive. Save this file and then copy it to the computer that has Rapise installed. Now, on the Offline Activation screen:
Click the Step 3 Open button and browse to the Rapise.CDM file. Once you have the file selected, click the Finish button to complete the activation. Assuming that the Rapise.CDM file is valid, the application will start.
Note
If you have any problems activating your installation, please go to https://www.inflectra.com/Support and contact Inflectra customer support, and they will help you resolve your problem.
Upgrading from Demo License
If you have installed a demonstration license, when the expiration date is reached, the software's functionality will be limited, and you will be prompted to purchase a commercial license. To purchase the commercial license, go to http://www.inflectra.com/Rapise and click the appropriate Purchase link to obtain a commercial production license.
Once you have purchased the license, your Customer Area will display a new activation code. Simply start Rapise, enter the new activation code, and follow the process described in the Activating Online or Activating Offline sections.
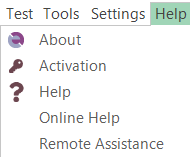
If you want to upgrade your license before the demonstration license expires, you need to click Help > Activation:
This will bring up the Activation dialog box:
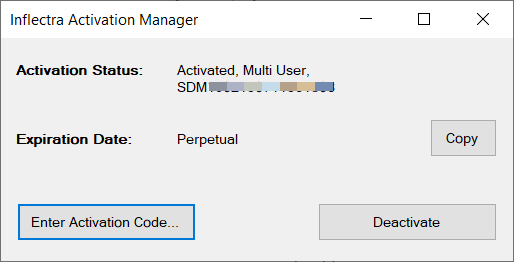
Click the Enter Activation Code button and then follow the process described in the Activating Online or Activating Offline sections to activate the product with the new production license.
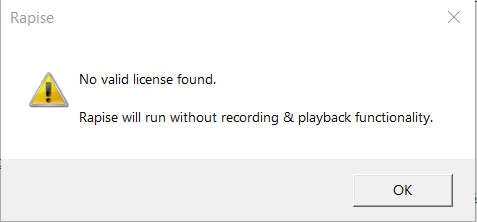
Without a valid license, Rapise will continue to work, but its Recording and Playback functionality will be disabled.
Transferring to Another Computer
Sometimes you need to transfer your Rapise license from one computer to another, or the computer it's installed on needs to be rebuilt. In either case, it's important that you first deactivate the product from the current computer; otherwise, you will be prevented from activating the product on the new/rebuilt computer.
To deactivate your current installation, you need to click the Activation button in the Help section of the Rapise Test ribbon:
This will bring up the Activation dialog box:
Click the Deactivate button, and the activation system will contact our activation server, process the deactivation code, and deactivate the license. If you visit the Customer Area of our website, you will see that it is listed as deactivated, with the option to activate it now available:
Note
If you have any problems deactivating your installation, please go to https://www.inflectra.com/Support and contact Inflectra customer support, and they will help you resolve your problem.
Legal Notices
This publication is provided as is without warranty of any kind, either express or implied, including, but not limited to, the implied warranties of merchantability, fitness for a particular purpose, or non-infringement.
This publication could include technical inaccuracies or typographical errors. Changes are periodically added to the information contained herein; these changes will be incorporated in new editions of the publication. Inflectra® Corporation may make improvements and/or changes in the product(s) and/or program(s) and/or service(s) described in this publication at any time.
The sections in this guide that discuss internet web security are provided as suggestions and guidelines. Internet security is a constantly evolving field, and our suggestions are no substitute for an up-to-date understanding of the vulnerabilities inherent in deploying internet or web applications. Inflectra® cannot be held liable for any losses due to breaches of security, compromise of data, or other cyber-attacks that may result from following our recommendations.
The section of the manual that describes modifying the Windows System Registry ("Registry") should only be attempted by experienced Windows administrators who are familiar with its organization and contents. Inflectra® cannot be held liable for any losses due to damage to the system registry made by inexperienced personnel.
SpiraTest®, SpiraTeam®, Rapise® and Inflectra® are either trademarks or registered trademarks of Inflectra Corporation in the United States of America and other countries. Microsoft®, Windows®, Explorer® and Microsoft Project® are registered trademarks of Microsoft Corporation.
All other trademarks and product names are property of their respective holders.
Please send comments and questions to:
Technical Publications Inflectra Corporation 8121 Georgia Ave, Suite 504 Silver Spring, MD 20910-4957 USA