Learn an Object
To illustrate learning an object, we return to the TwoDialogs sample.
First, let's learn the OK button by recording. We have done this before in the TwoDialogs sample.
RECORD
Step 1. Run the Application
Run the TwoDialogs sample application. By default, this is located in:
1 | |
Step 2. Create a New Test
Start Rapise and create a new test. Choose the Basic methodology and name it TwoDialogsRecording. Select JavaScript scripting mode when prompted.
Step 3. Start Recording
Press the Record button in the toolbar of Rapise.
Step 4. Select an Application to Record
When the Select an Application to Record dialog appears, choose the TwoDialogs.exe application. In the library list, select only the top library: Auto. Then, press the Select button.
Step 5. Do Recording
In the TwoDialogs application, use the mouse to click the OK button. Dismiss the alert message box that appears (it will indicate an empty name).
Step 6. Observe
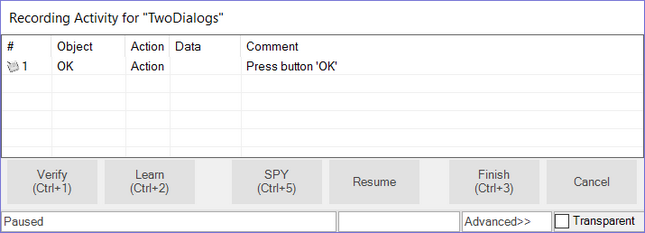
Notice that two things will occur: First, the OK button will be surrounded by a red marker, indicating that it has been learned. Second, the action of clicking the OK button is recorded in the Recording Activity dialog. This recording will have a single entry:
Step 7. Finish Recording
Press the Finish button (or press Ctrl+3) to end the recording.
Step 8. Observe
Rapise will return to the foreground and will have selected Main.js. Notice that a single line of script has been added to the script file:
SeS("OK").DoAction();
This line of script has two interesting components.
The SeS("OK") represents the identity (not the locator or location) of the OK button. This is the object that was learned during recording.
The DoAction() instructs the running script to perform the action associated with a button. A typical button has only one possible action: to be pressed.
The Record/Learn process performs both steps for you and joins them together.
Now, let's use (normal) object learning to learn the same OK button and to call a method on the object.
LEARN
Step 1. Run the Application
Run the TwoDialogs sample application. By default, this is located in:
1 | |
Step 2. Create a New Test
Start Rapise and create a new test. Choose the Basic methodology and name it TwoDialogsLearn. Select JavaScript scripting mode when prompted.
Step 3. Start Recording
Press the Record button in the toolbar of Rapise.
Step 4. Select an Application to Record
When the Select an Application to Record dialog appears, choose the TwoDialogs.exe application. Leave the library selection in its default state; we will not be using it this time. Press Select. Wait for the Recording Activity dialog to appear in the lower-right corner of the screen.
Step 5. Do Learn
Hover the mouse over the OK button of the TwoDialogs AUT, but do not click the button.
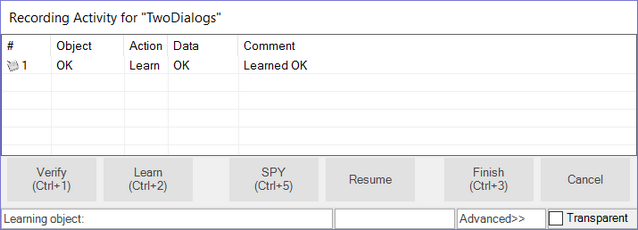
With the mouse positioned over the OK button, press Ctrl+2 (the Learn command). You will see the OK button surrounded by a red highlight. You will also see that the Recording Activity dialog has been updated with a Learn event.
Step 6. Finish Recording
Press the Finish button or Ctrl+3 to end the recording session.
Step 7. Observe
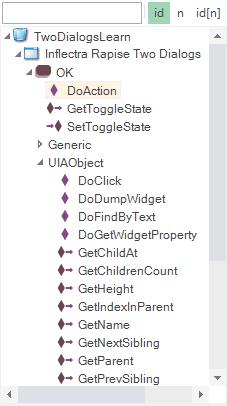
You will now see that Rapise has learned about the OK button. The Object Tree in the upper-left pane of Rapise will have a new entry called OK (shown here expanded). The list of items contained under the OK button entry in the Object Tree is the set of methods and properties available for the OK object.
Actions and properties have different icons. The items are grouped by library. For example, the DoAction() method is unique to the OK UIAButton object, whereas the DoClick() method is generic and available for all Windows objects.
Notice that DoAction is listed. Recall that in the previous section, when we recorded pressing the button, the DoAction method was chosen for the button-press action.
While examining this OK object, let's make a few observations. These observations will be useful for your future interactions with Rapise and will make scripts more informative and relevant as you delve deeper into Rapise. First, look at the Properties box that appears below the Object Tree in the bottom-left corner of the Rapise screen. The screenshot below has some of the tree nodes expanded.
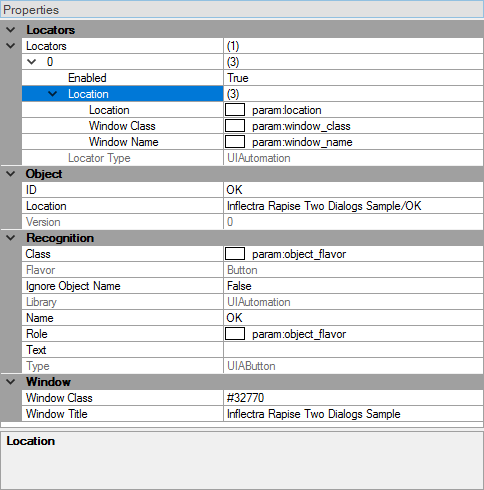
First, notice that the
OKbutton has a locator defined. When Rapise learns an object, it collects data about that object so that it can relocate it, even if the application has moved on the screen or is in a different state of execution. As bad as, or perhaps worse than, not being able to find an object would be finding the wrong object on the AUT. Every time Rapise is required to locate this object, it will first attempt to use the primary locator. If it fails to positively and uniquely match with that locator, it will then try the second (if defined), and so on. Rapise will not give up and declare failure until it has failed to identify it using all available locators.Second, notice the
IDentry in the Object section of the pane. This is the name of the object from Rapise's perspective. All Rapise objects are available through theSeS()function call. Therefore, to refer to theOKobject, you will useSeS("OK"). Once the object is correctly identified, all valid methods and properties can be accessed using that object as the basis.Third, notice that no code has been added to the main editor window of Rapise. When you identified the
OKbutton, Rapise only added the new object to the Object Tree. It did not write any code in the JavaScript file.
Step 8. Use Learned Object
In the automated (recorded) section above, you saw that when you clicked the OK button on the dialog, Rapise recorded a function similar to this:
SeS("OK").DoAction();
This time, you will use the established name of the OK button object, but perform a slightly more interesting action than its default to demonstrate Rapise's capabilities.
Move the cursor into the editor pane of Rapise and ensure you are editing the Main.js file. At the moment, this file still looks something like this:
//########## Script Steps ##############

function Test(params)
{

}

g_load_libraries=["UIAutomation"];
Between the opening and closing braces, add the following command:
SeS("OK").DoClick();
Click the Play button and observe what happens.
The click will register as a command to the object, and it will perform the action on the object.
While we have the context of this situation, let's complicate it slightly to illustrate Rapise's intricacy and flexibility.
There is a method whose name looks interesting: DoLButtonDown().
If we were to invoke DoLButtonDown() on the OK object, we might expect this to be the same as DoClick().
However, go back to the AUT for a moment. Using the mouse, press the left mouse button over the OK button, but do not release it.
The button will appear to be pressed, but it will not be clicked.
The reason for this is that the DoClick() (or DoAction()) events cause the mouse button to be clicked and released.
Therefore, we would need a pair of events:
SeS("OK").DoLButtonDown();
SeS("OK").DoLButtonUp();
in order for the "click" to occur.
Try this in the test script you created by adding those two lines of code in place of the DoClick() line.
It does not work!
Let's explore this problem further.
When you click the Play button, leave the mouse untouched. Just click the Play button in Rapise and then remove your hand from the mouse.
The script does not click the OK button in the TwoDialogs AUT.
Now, click the Play button in Rapise and quickly move the mouse to hover over the OK button in the TwoDialogs AUT.
Now it works.
What is happening here is that the DoLButtonDown() and DoLButtonUp() methods simulate pressing the mouse irrespective of where the mouse cursor is positioned.
The other functions, DoClick and DoAction, are methods that are applied to the button, meaning they act directly on the button object.
Before we can expect DoLButtonDown() and DoLButtonUp() methods to work, we must first move the mouse cursor to the button.
function Test(params)
{
    SeS("OK").DoMouseMove(25, 15);
    SeS("OK").DoLButtonDown();
    SeS("OK").DoLButtonUp();
}
will accomplish this.
Notice that Rapise will actually move the mouse cursor to the coordinates (25, 15) within the OK button. Also, notice that if you move the mouse while the test is playing, the test will fail.
As a final experiment, try moving the mouse outside the boundaries of the OK button object before calling the DoLButtonDown() function.
function Test(params)
{
    SeS("OK").DoMouseMove(250, 150);
    SeS("OK").DoLButtonDown();
    SeS("OK").DoLButtonUp();
}
Once again, the script will fail.