Main Menu and Toolbars

File
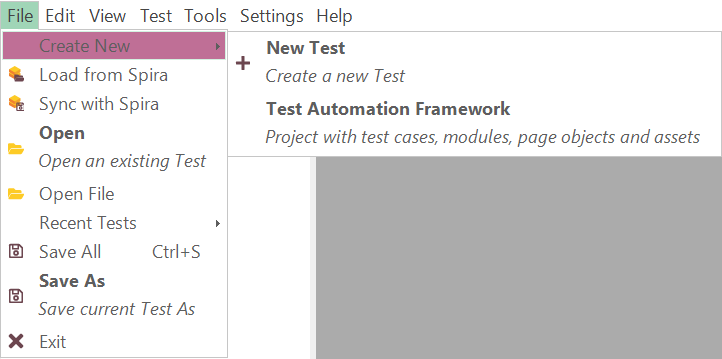
Default:
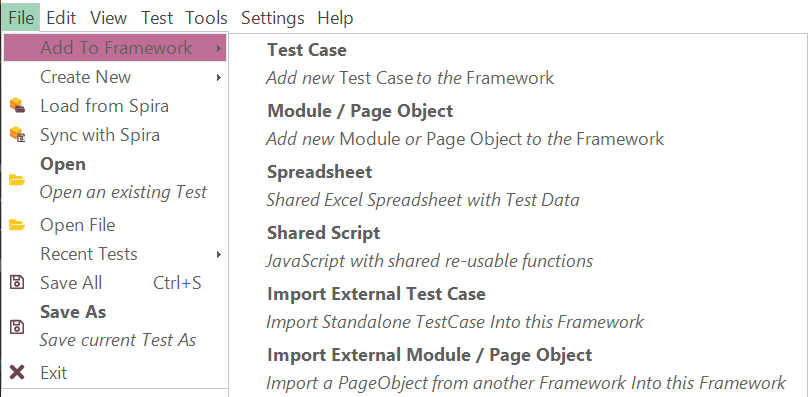
Framework:
The File menu provides quick access to all file management functions in Rapise. Many of these are also available on the main toolbar.
- Create New
- New Test - Creates a new standalone Rapise test that can be saved either to Spira or locally.
- Test Automation Framework - Starts a new testing framework.
- Add To Framework - Add items to a testing framework
- Test Case - Adds a new test case.
- Module / Page Object - Adds a new module/page object.
- Spreadsheet - Adds a new shared spreadsheet.
- Shared Script - Adds a new shared JavaScript script for common functions and variables.
- Import External Test Case - Imports an external test case or a standalone test created earlier into the current testing framework.
- Import External Module / Page Object - Imports an external module/page object from another testing framework into this one.
- Open - Opens an existing test (
.sstest) that is already available locally. - Open Test from Spira - Opens a test from the SpiraTest test management repository and downloads it to the local repository.
- Save to Spira - Saves the current test to the Spira test management system, updating the version in your Spira test management repository.
- Open File - Opens a single file and displays it in the editor. The file is not added to the current test project.
- Recent Tests - Opens one of the recently used test projects.
- Save All (Shortcut: CTRL+S) - Saves the current test project and all open documents locally. To save to a different location, use the Save As option (available via
File > Save As). - Save As - Creates a new, differently named copy of the test project and all files explicitly included in it.
- Exit - Exits Rapise.
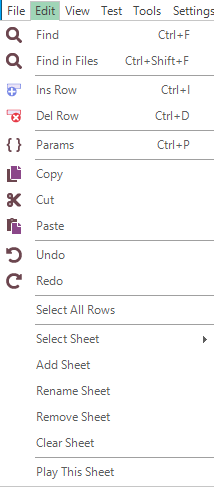
Edit
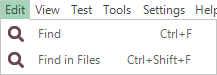
The Edit menu provides tools for editing the currently open script file. Menu contents depend on the active editor currently open in the content view.
Default:
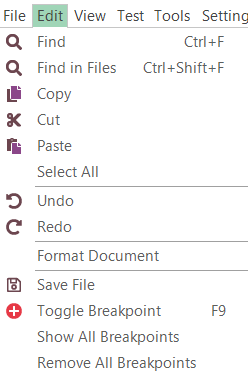
JavaScript:
RVL:
Manual:
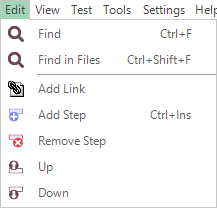
- Find, Find in Files - Searches using the Find and Replace Dialog.
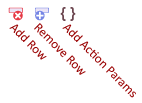
- Ins Row (Shortcut: Ctrl+I)
- RVL: Inserts an RVL row before the active one.
- Del Row (Shortcut: Ctrl+D)
- RVL: Deletes the active row. If several rows are selected, all of them are deleted.
- Params (Shortcut: Ctrl+P)
- RVL: Shows all parameters (including optional) for the currently edited action.
- Add Link
- Manual: Inserts a link to another manual step.
- Add Step (Shortcut: CTRL+Ins)
- Manual: Appends a new manual step to the end.
- Remove Step
- Manual: Deletes the selected step.
- Up
- Manual: Moves the selected step up.
- Down
- Manual: Moves the selected step down.
- Save Manual Test to Spira
- Manual: Uploads all modified steps to the Spira test case.
- Save Manual Test Locally
- Manual: Saves manual test case steps as a local .rmt file.
- Reload Manual Test from Spira
- Manual: Loads/reloads test steps from the Spira test case, overriding local changes.
- Select All
- JavaScript: Selects all text in the text editor.
- Copy (Shortcut: CTRL+C)
- JavaScript: Copies any highlighted text to the clipboard.
- RVL: Copies selected rows or cells.
- Cut (Shortcut: CTRL+X)
- JavaScript: Erases any highlighted text and copies it to the clipboard.
- RVL: Copies rows to the clipboard.
- Paste (Shortcut: CTRL+V)
- JavaScript: Pastes content from the clipboard.
- RVL: Pastes cells from the clipboard.
- Undo (CTRL+Z) Reverses the last deletion or insertion.
- Redo (CTRL+Y) Reverses the last undo action.
- Format Document Formats the current JavaScript or JSON document using code formatting.
- Toggle Breakpoint (Shortcut: F9) Inserts or removes a breakpoint at the current cursor position.
- Show All Breakpoints Displays all breakpoints in the Warnings window. You can click on them to navigate to their corresponding location.
-
Remove All Breakpoints Removes all breakpoints in the current test project.
-
Save File
- JavaScript: Saves the script file you are editing.
- Select All Rows
- RVL: Selects all rows in the currently visible sheet.
- Select Sheet
- RVL: Switches to an RVL sheet.
- Add Sheet
- RVL: Creates a new RVL sheet.
- Rename Sheet
- RVL: Renames the current RVL sheet.
- Remove Sheet
- RVL: Removes the current RVL sheet.
- Clear Sheet
- RVL: Clears all rows in the current RVL sheet.
- Play This Sheet
- RVL: Executes the current sheet.
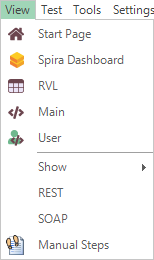
View
The View menu contents depend on the active editor currently open in the content view.
Default:
Manual:
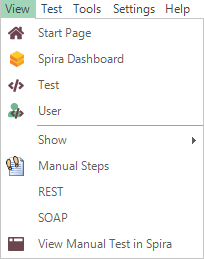
- Start Page - Opens the Rapise Start Page.
- Spira Dashboard - Opens the Spira Dashboard.
- RVL - Opens the RVL editor.
- Main - Opens the primary test script file (normally
Main.js). - User - Opens the user functions script file containing any user-defined testing functions (called
User.js). -
Show
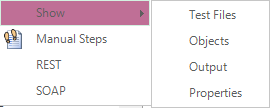
- View > Show > Test Files - Shows and highlights the Test Files view.
- View > Show > Objects - Shows and highlights the Objects repository tree.
- View > Show > Output - Shows and highlights the output view.
- View > Show > Properties - Shows and highlights the Properties view.
-
Manual Steps - Opens manual test steps for a given step (if any). If no manual steps are defined yet, it creates new ones.
- REST - Finds and opens a SOAP definition file in the content view. If no
.soapfile is yet defined, nothing happens. - SOAP - Finds and opens a REST definition file in the content view. If no
.restfile is yet defined, nothing happens. - View Manual Test in Spira
- Manual: Opens the current test in the Spira web interface. Remember to use
File > Save to Spiraif you made any local changes to manual steps.
- Manual: Opens the current test in the Spira web interface. Remember to use
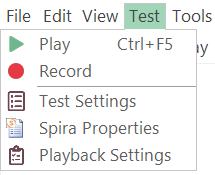
Test
The Test menu contents depend on the active editor currently open in the content view.
Default
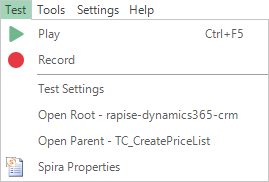
Legacy/Sub-Tests:
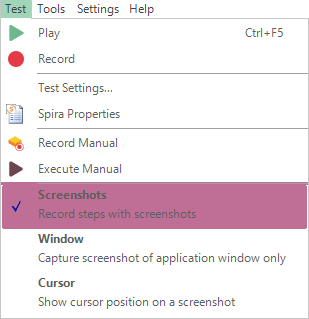
Manual:
- Play - Executes the current test.
-
Record - Used for recording and learning, this item opens the Recording Activity Dialog when clicked.
Note: some additional options are available when using the Record button:
- Record - Clicking Record on its own starts Rapise recording using the currently selected libraries (this is the default action).
- Shift+Record - This brings up the library selector (shown above) and is equivalent to clicking the [] libraries button in the ribbon before starting recording.
- Ctrl+Record - This brings up the application selector (see below) and lets you change the application and library being recorded.
-
Test Settings - Displays test settings.
- Open Root ...... - Opens the root of the current test framework in this Rapise window. This option is only visible when you are in a sub-test of any nesting level.
- Open Parent ...... - Opens the parent test containing this sub-test in this Rapise window. This option is only visible when the parent is not yet a framework root (i.e., when you have a deeply nested test case).
- Spira Properties - Opens the Spira Properties dialog, which allows you to see the name of the SpiraTest project and test case that the current Rapise test is linked to.
- Playback Settings - Opens the Test Execution Parameters dialog, which allows you to change local playback parameters of the current framework. Use this option if you need to change parameters before executing RVL > Play actions.
-
Record Manual
- Manual: Starts the Select Application to Record dialog box. This dialog box is the same one used for automated testing; however, when you click through the application under test, it records manual test steps instead of automated script code.
-
Execute Manual
- Manual: Executes the current manual test. You will be prompted to save the test case to Spira, and then the latest version from Spira will be downloaded into the Rapise manual test execution wizard so that you can begin manual testing.
-
Screenshots
- Manual: This option tells Rapise to capture the current screenshot when performing manual recording and include the screenshot with the recorded test step. It has two sub-options:
- Window
- Manual: When checked, this records the entire window. Warning: this may consume large amounts of disk space. Otherwise, it records just the object underneath the current cursor.
- Cursor
- Manual: When checked, this records the location of the mouse pointer/cursor inside the image.
Tools
The Tools menu contents depend on the active editor currently open in the content view.
Default:

Manual:
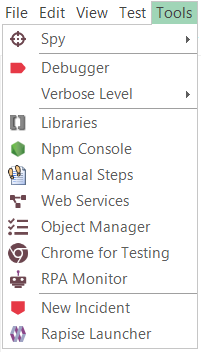
- Spy - Dropdown to select the active Spy. You use the Spy to examine the running application and find specific objects on which to perform an operation or verification.
- Debugger - Toggles the debugger.
- Verbose Level - Drop-down list that controls the Verbosity Level.
- Libraries - This button opens the Select an Application Dialog, allowing you to add or change the libraries used to record the current test.
- Npm Console - Shows an
npm consolefor the current testing framework. This allows you to quickly install new packages or initialize using an existingpackage.json. - Web Services - Allows you to add a new web service definition to your Rapise test. Clicking this displays the Add Web Service dialog box.
- Object Manager - Opens the Object Manager add-in, which is used to copy recorded objects between test scripts.
- Chrome for Testing - Opens the Chrome for Testing dialog.
- RPA Monitor - Opens the RPA Monitor.
- Rapise Launcher - Starts the Rapise Launcher.
Settings
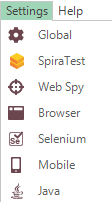
Provides access to all global settings and options in Rapise. Settings relevant to only the current test are available via Test > Test Settings...
- Global - Brings up the Global Settings dialog, which lets you change any system-wide settings for Rapise.
- SpiraTest - Takes you to a dialog box that lets you change how Rapise is integrated with the SpiraTest test management system. It allows you to change the URL, username, and password used to connect.
- Web Spy - Displays the Web Spy Settings dialog box, which allows you to change settings related to using the Web Spy to inspect DOM objects in web pages.
- Selenium - Displays the Selenium settings dialog box, which is used to edit the different Selenium web browser profiles that can be used by Rapise.
- Mobile - Displays the Mobile Settings dialog box, which lets you configure the different mobile devices available for testing by Rapise.
- Java - Displays the Install Java Access Bridge dialog box. Installing the Java Access Bridge allows Rapise to connect to Java AWT/Swing applications so that they can be tested.
Help
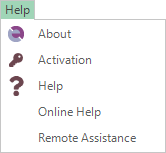
- About - Provides information about the running instance of Rapise, including the version number.
- Activation - Opens the Rapise license activation screen. This can be used to deactivate the current license so that it can be used on a different machine.
- Help - Provides access to the interactive help system. You can also open the help system by pressing F1 on the keyboard.
- Online Help - Opens the online version of the help system (updated regularly).
- Remote Assistance - Launches a GoToMeeting session with a given ID. Since Rapise 7.3, it launches a Zoom meeting.
Read more about Remote Assistance.
Report
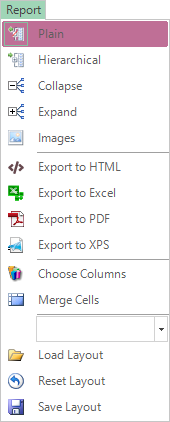
The Report menu is available anytime a report (.trp) file is visible in the Content View.
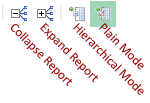
- Plain - Views test steps, assertions, and messages aligned in a table.
- Hierarchical - Switches to a hierarchical display to more clearly see which assertions, messages, and data are associated with which test steps.
- Collapse - Collapses the report to show only the top level. What is visible will depend on how the report is sorted.
- Expand - Expands all report rows.
- Images - Toggles between hiding and revealing images.
- Export to HTML - Saves the report as an HTML document.
- Export to Excel - Saves the report as an Excel file.
- Export to PDF - Saves the report as an Acrobat PDF file.
- Export to XPS - Saves the report as an XML Paper Specification file.
- Choose Columns - Hides or reveals report columns.
- Merge Cells - Merges identical consecutive cells.
- This drop-down list lets you choose between previously saved layouts. The selected layout is loaded using the Load Layout item.
- Save Layout - Presses to keep your layout changes after closing Rapise.
- Reset Layout - Undoes any changes you've made.
See Also:
Debugger
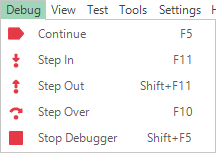
The Debugger menu and toolbar are available while the JavaScript debugger is active. To use the Debugger, first enable it by toggling the corresponding toolbar button:

Then play your script.
- Continue
++f5++- Continues executing the script. - Step In
++f11++- Steps into a function/procedure. - Step Out
++shift+f11++- Continues until the current procedure is exited. - Step Over
++f10++- Goes to the next line in the current procedure/function. - Stop Debugger
++shift+f5++- Stops executing the script and exits the debugger.
Main Toolbar
The Main toolbar is the primary toolbar providing tools to help with creating and executing tests. It is always visible:

RVL Toolbar
The RVL toolbar is shown for the RVL editor:
Manual Toolbar
The Manual toolbar is shown for the manual test editor:

- Select Current Release Dropdown list that displays the list of releases in the current Spira project. You can then choose the appropriate release against which the current test is being executed.
Report Viewer Toolbar
The Report toolbar is shown for the report viewer:
Debugger Toolbar
The Debugger toolbar is shown while a JavaScript debug session is active. It is a set of shortcuts for the Debugger menu:
