Data-Driven Testing (JavaScript)
Purpose
Data-driven testing is an automated testing technique in which test case data is separated from test case logic. Each set of test case data consists of input values and a set of expected output values. The actual output values are compared to the expected output values to determine whether the test passed.
You can perform data-driven testing using either an MS-Excel spreadsheet as the data source or a relational database.
Using an MS-Excel Spreadsheet
The Spreadsheet object is useful for implementing data-driven tests. It allows you to connect to, query, and read an Excel spreadsheet from your test script. To create a data-driven test, you will:
1. Record a Test
The exact inputs you use for the recording will not matter as much as your interactions with the objects. The following excerpt was recorded using www.google.com:
    function Test()
    {
        //Set Text Inflectra in q
        SeS('Obj1').DoSetText("Inflectra");
        //Click on btnG
        SeS('Obj2').DoClick();
    }
2. Parameterize the Test() Function
The Test() function contains all of the procedural logic for the test. Replace input values with variables. Encapsulate the logic in a nested function with one parameter for each variable you created. For example, we will parameterize the Test() function we created in step one:
function Test()
{
    function Logic(searchterm)
    {
        //our new function encapsulates the test logic
        //Set Text using searchterm
        SeS('Obj1').DoSetText(searchterm) //here we changed a hard-coded value into a variable
        //Click on btnG
        SeS('Obj2').DoClick()
    }
    Logic("Inflectra") //don't forget to call your new function
}
3. Create the Test Case Data
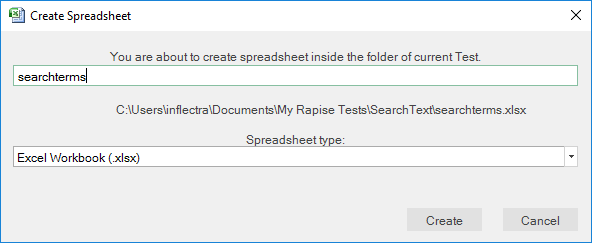
Create a spreadsheet named searchterms.xlsx. To do this, right-click the test node and choose Create > Spreadsheet....
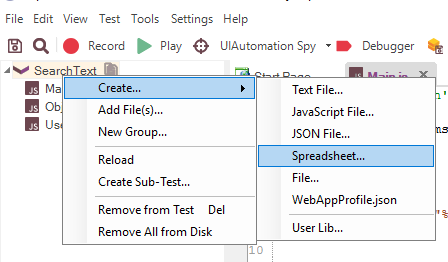
Enter the name and click the Create button.
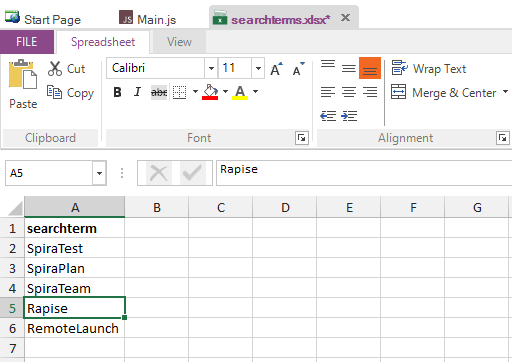
In the spreadsheet, create a column for every variable from step two. Add columns for any expected output values you wish to verify. Each row is a test case. In our Google example, we only have one input value (searchterm), and we're not comparing any expected output values, so we will only need one column in our spreadsheet.
4. Attach Spreadsheet Object to searchterms.xlsx
Drag the searchterms.xlsx from the files tree into the appropriate place in your test source:
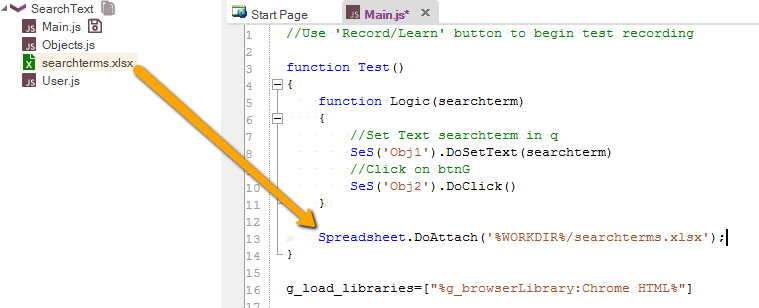
5. Use Spreadsheet to Access the Test Case Data
In our example, we use a Spreadsheet object to run the test logic once for every row.
function Test()
{
    function Logic(searchterm)
    {
        //Set Text searchterm in q
        SeS('Obj1').DoSetText(searchterm)
        //Click on btnG
        SeS('Obj2').DoClick()
    }

    Spreadsheet.DoAttach('%WORKDIR%/searchterms.xlsx');

    // Go through all rows
    while(Spreadsheet.DoSequential())
    {
        // Read cell value from column 0
        var term = Spreadsheet.GetCell(0);
        // Pass it into Logic function
        Logic(term);
    }
}
Using a Relational Database
Rapise comes with the Database global object, which allows you to send SQL queries to a database and then iterate through the results. The process for creating such a data-driven test is as follows:
1. Record a Test
The exact inputs you use for the recording will not matter as much as your interactions with the objects. The following excerpt was recorded using www.google.com:
    function Test()
    {
        //Set Text Inflectra in q
        SeS('Obj1').DoSetText("Inflectra");
        //Click on btnG
        SeS('Obj2').DoClick();
    }
2. Parameterize the Test() Function
The Test() function contains all of the procedural logic for the test. Replace input values with variables. Encapsulate the logic in a nested function with one parameter for each variable you created. For example, we will parameterize the Test() function we created in step one:
function Test()
{
    function Logic(searchterm)
    {
        //our new function encapsulates the test logic
        //Set Text using searchterm
        SeS('Obj1').DoSetText(searchterm) //here we changed a hard-coded value into a variable
        //Click on btnG
        SeS('Obj2').DoClick()
    }
    Logic("Inflectra") //don't forget to call your new function
}
3. Use Database to Connect the Test Case Data.
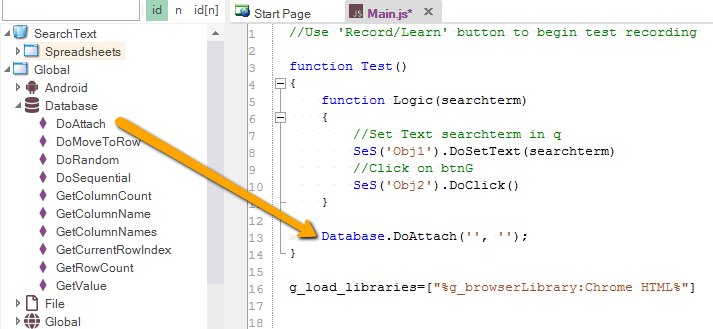
This assumes that you already have an ODBC- or OLE DB-compatible relational database that contains the necessary test data. Drag the Database global object into the script editor:
and then use the following methods:
- Database.DoAttach() - to make the database connection and specify the SQL query.
- Database.GetRowCount() - to verify that there is data.
- Database.DoSequential() - to loop through the data set row by row.
- Database.GetValue() - to get that row's data.
Here is an example of the code needed to loop through a list of records (taken from the SpiraTest database) and call our Logic() parameterized function with the appropriate test data:
var success = Database.DoAttach('Provider=SQLOLEDB.1;Integrated Security=SSPI;Persist Security Info=False;Initial Catalog=SpiraTest;Data Source=.' , 'SELECT * FROM TST_PROJECT' );
Tester.Assert('Successfully Connected', success);

var count = Database.GetRowCount();
Tester.Message(count);

//Loop through the rows
while(Database.DoSequential())
{
    var projectId = Database.GetValue("PROJECT_ID" );
    var name = Database.GetValue( "NAME");
    var description = Database.GetValue("DESCRIPTION" );
    Logic(name);
}
See Also
- KB357 Data-driven testing with spreadsheets and RVL
- KB317 Read external Excel spreadsheet in RVL
- The Connection Strings Reference