Testing REST Web Services
What is REST and what is a RESTful web service?
RE**presentational **S**tate **T**ransfer (**REST) is a style of software architecture for distributed systems such as the World Wide Web. REST has emerged as a web API design model that offers greater simplicity compared to other web service protocols such as SOAP and XML-RPC.
A RESTful web API (also called a RESTful web service) is a web API implemented using HTTP and REST principles. Unlike SOAP-based web services, there is no "official" standard for RESTful web APIs. This is because REST is an architectural style, whereas SOAP is a protocol.
How does Rapise test REST web services?
Creating a REST web service test in Rapise consists of the following steps:
-
Using the REST definition builder to create the various REST web service requests and verify that they return the expected data in the expected format.
-
Parameterizing these REST web service requests into reusable templates, and saving them as Rapise learned objects.
-
Generating the test script in JavaScript that uses the learned Rapise web service objects.
Rapise REST Definition Builder
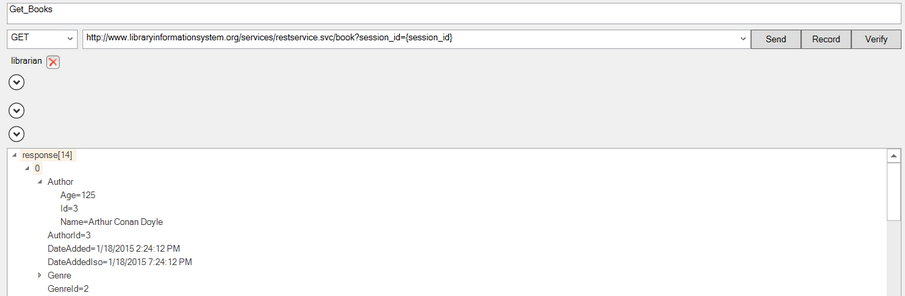
When you add a web service to your Rapise test project, a new REST definition file (.rest) is created to store all your prototyped requests for a specific REST web service. The various REST requests are then created within the REST definition builder:
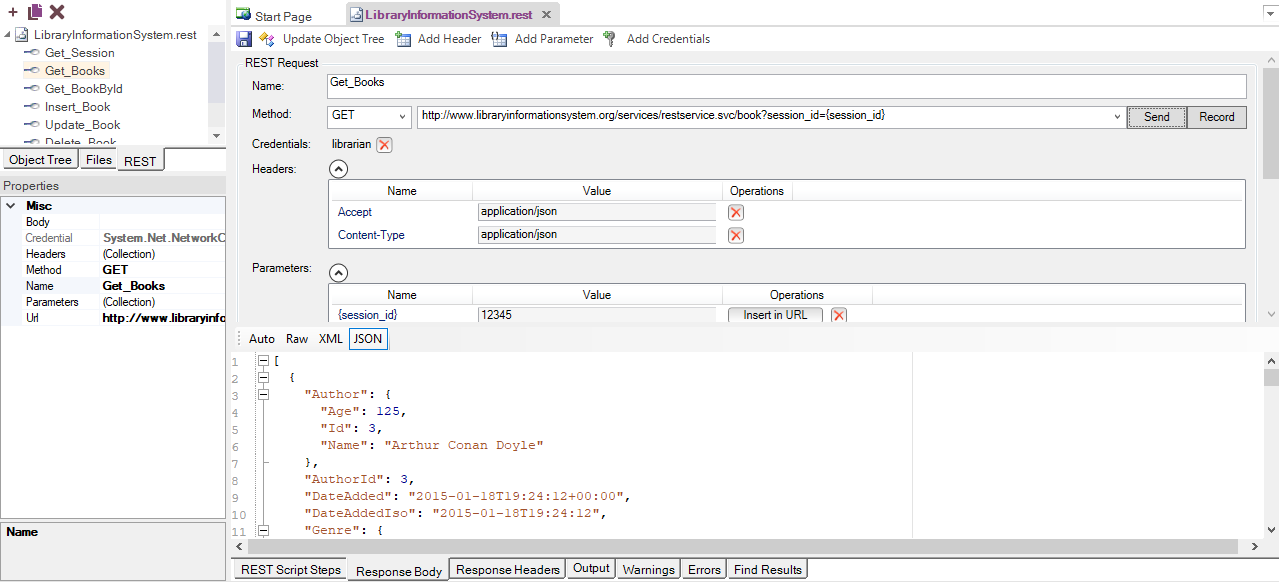
Each REST request can include the following items:
-
Method - The type of HTTP request being made (GET, POST, PUT, DELETE, etc.)
-
URL - The URL of the web service request, including any parameter tokens (e.g., {session_id} in the example above).
-
Credentials - Any HTTP Basic Authentication headers.
-
Headers - Any other HTTP headers (standard and custom).
-
Parameters - Any parameters defined in the URL that will be called from the Rapise test script.
-
Body - The body of the request (for POST and PUT requests). This can be in any text-serialized format such as XML or JSON.
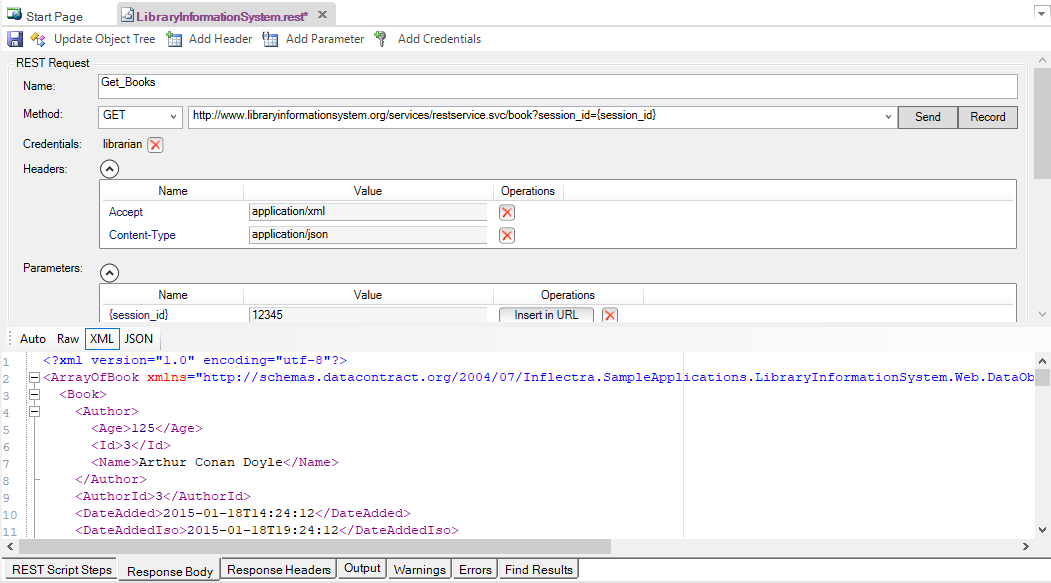
When you execute the request, it returns the HTTP response headers. If the MIME content-type is recognized as either XML or JSON, the response will be formatted for improved readability by the tester:
Once you have finished prototyping the web service test operations, you can save the request definitions and use the Update Object Tree option to populate the main Rapise Object Tree.
Web Service Object Recognition
When Record REST Objects API Recording option is set to true, Rapise converts each REST web service request prototyped in the REST definition editor into a scriptable object:
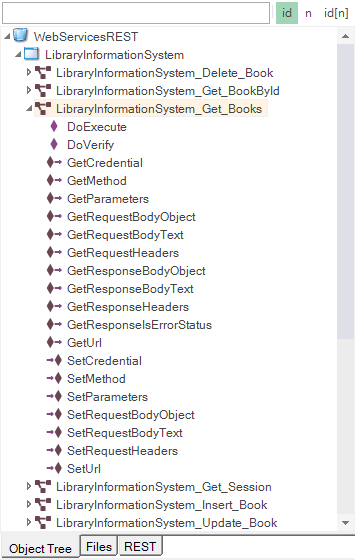
Each of the REST service objects in the tree has operations designed to let you call the method and access the returned body. If the web service returns data in JSON format, the object can send/receive data as native JavaScript objects.
Rapise provides access to the following attributes of the HTTP request before and after its execution:
-
Request:
-
Method
-
URL
-
Headers (including authentication)
-
Body
-
-
Response:
-
Headers
-
Body
-
Generating Rapise REST Test Scripts
Once all REST operations have been defined and saved as Rapise learned objects, you can call them from within your Rapise test scripts.
The easiest way to do this is to click the Record button in the REST definition editor (next to the Send button), which will add the request to the list of recorded steps:
Usually, you need to verify the data returned, as well as call the REST method. To do this, go to the Verify text box beneath the Body section:
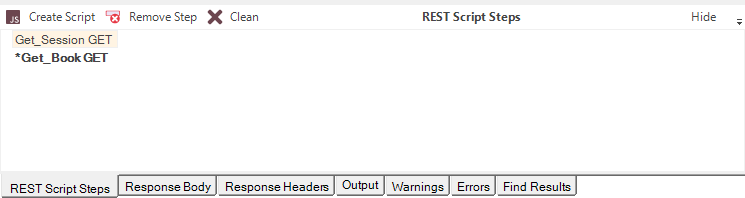
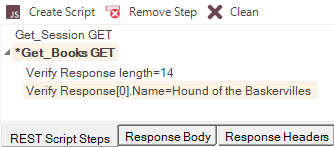
If you select the overall array response[14] and click the main Verify button next to the Record button, the system will automatically add a verification step that verifies all the values. To try this, click the Verify button. This adds a bold verification step to the recorded script:
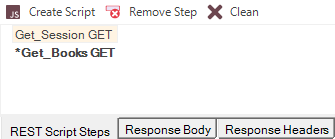
You will see a script step recorded with a verification test added (shown in bold with an asterisk*).
However, in many cases, you only want to verify certain properties. For example, we might want to verify only that 14 books are returned and that the first book has the correct name. To do this, right-click the response[14] entry to display the verification content menu:
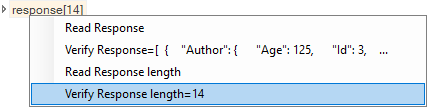
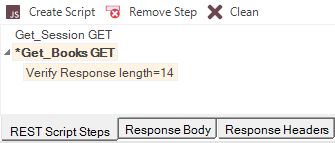
Choose the option Verify Response length=14. This adds the following step to the recorded script:
Now we want to verify the name of the first book returned. To do that, expand the “0” index entry and then right-click the “Name” property:
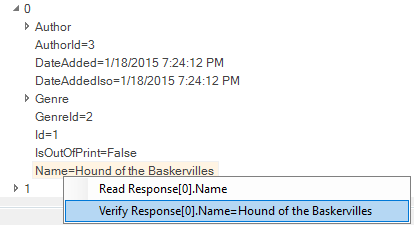
Choose the option to Verify Response[0].Name = Hound of the Baskervilles. This adds a verification step for this specific property:
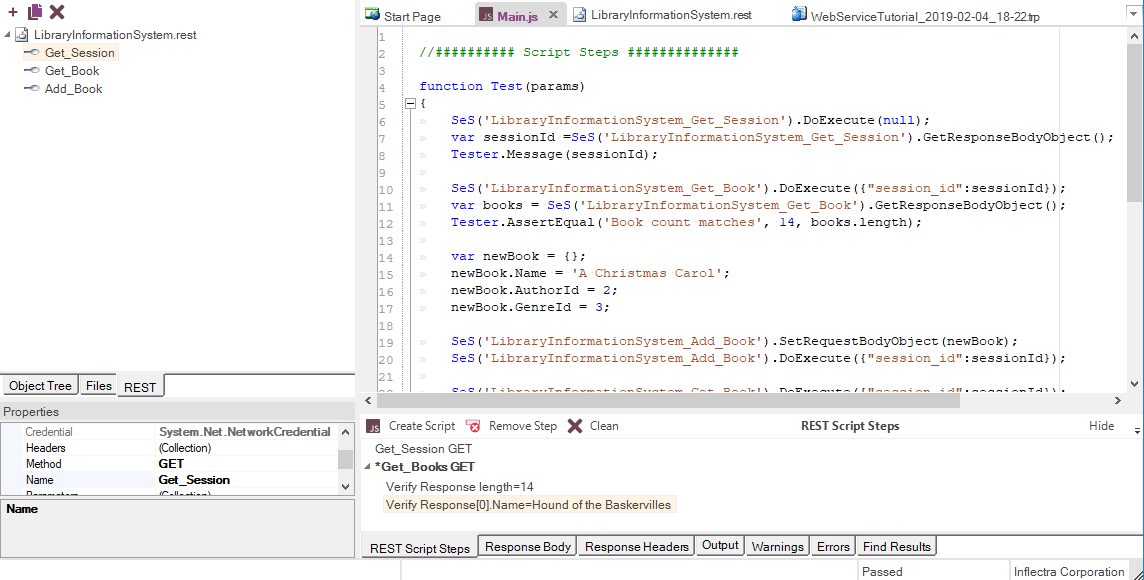
Once you are ready, click the Create Script and the test script will be created for you:
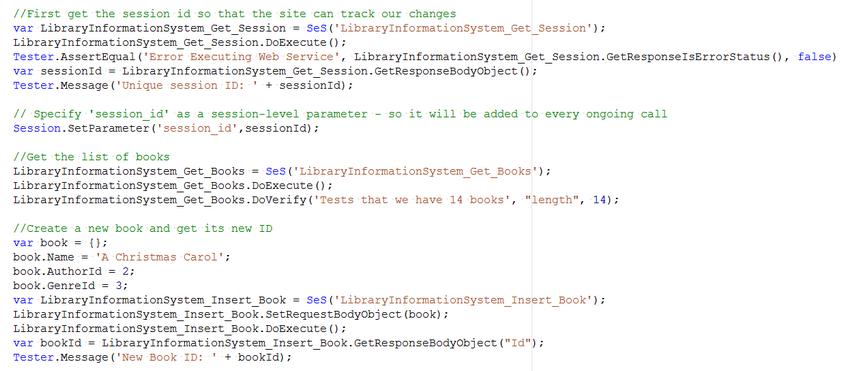
The script is always generated within the Test() function of the current Main.js file. The term current refers to the Main.js file of the test, test case, or Page Object / Module to which this .rest definition belongs.
In the case of a Page Object, you would need to cut the generated code from Test() and paste it into the corresponding <PageObject>_DoAction function.
As well as simply calling the DoExecute() method of each REST web service object to execute the previously defined operation, you can use the various properties on the REST service object to send specific parameter values, add/remove headers, change the authenticated user, change the request body, and inspect all attributes in the request and response.
This allows unparalleled control over the web service request, providing the ability to debug and diagnose web service issues, in addition to quickly calling the learned operations.
Since REST objects are just like any other Rapise object, you can have hybrid test scripts that call web service methods and also test GUI objects. This is very useful when you want to test how the user interface changes in response to specific web service API interactions, or when you have a user interface that connects to the server using a web service (for example, with a JSON-based AJAX web user interface).
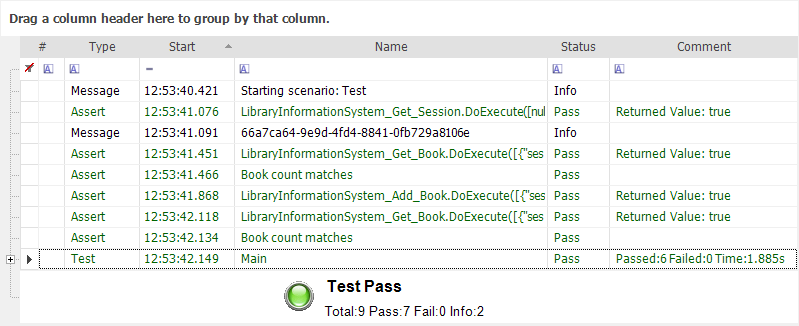
Once you have created your REST web service test, you can use the standard Playback functionality in Rapise to execute your test and display the report:
Handling Request Timeout
A special request or Session parameter named RequestTimeoutMs allows changing the timeout for the request. Otherwise, the default timeout (100000 = 100 seconds) is used.
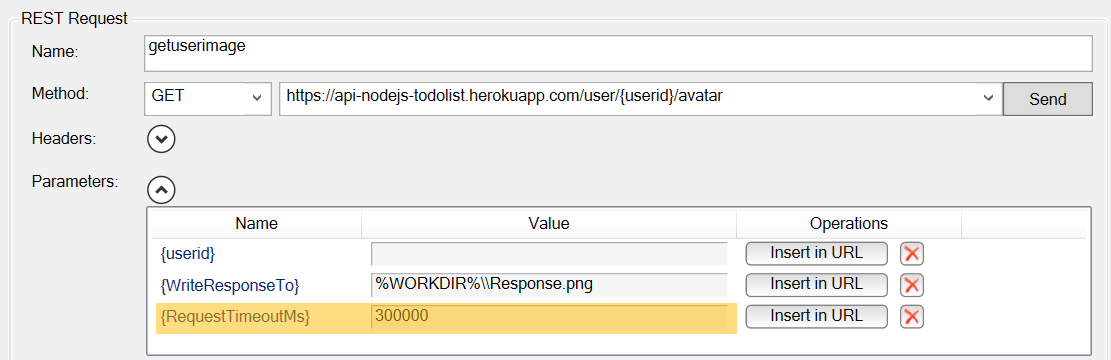
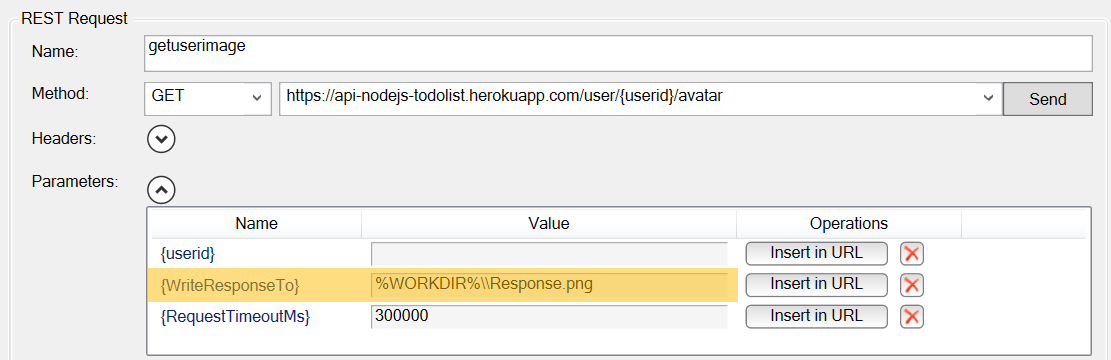
Handling Binary Downloads
The special parameter WriteResponseTo allows defining a path to the file where the full binary version of the server response is saved.
It should be a full path and may contain environment variable references (%WORKDIR%, %ROOT%, etc.).
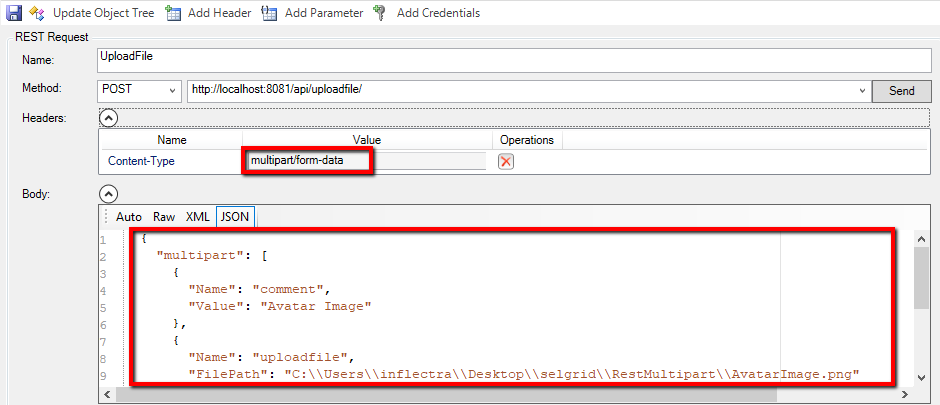
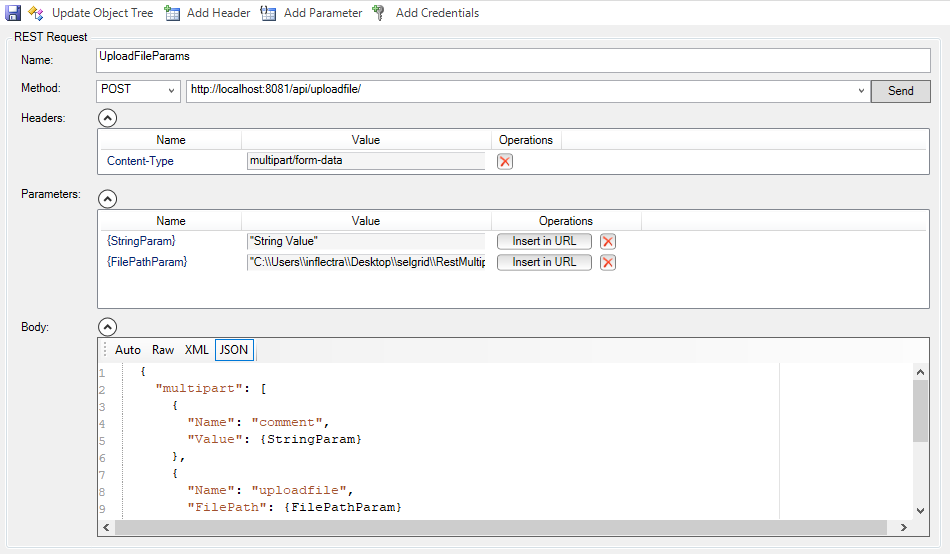
Handling File Uploads and Multipart Requests
Each request with Content-Type set to multipart/form-data is considered a special request and is handled in a special way.
The Body should be valid JSON with the following structure:
{
    "multipart":
    [
        {
            "Name": "name_of_text_field",
            "ContentType": "text/plain",
            "Value": "value"
        },
        {
            "Name": "uploadfile",
            "ContentType": "image/png",
            "FileName": "image.png",
            "FilePath": "path_to_file_for_upload"
        }
    ]
}
For text fields, ContentType is optional. By default, it is set to text/plain.
For file upload fields, ContentType and FileName are optional. By default, ContentType and FileName are auto-detected from the FilePath.
Here is an example of a minimal multipart request with one text field and one file upload:
{
    "multipart":
    [
        {
            "Name": "name_of_text_field",
            "Value": "value"
        },
        {
            "Name": "uploadfile",
            "FullPath": "c:\\some\\path\\to\\image.png"
        }
    ]
}
Handling mTLS Handshake
With mutual TLS (mTLS), the client presents a certificate to the server during the TLS handshake.
This certificate is typically stored in a PKCS#12 bundle (.pfx or .p12) that includes the client certificate and its private key.
Use the request or Session parameters PfxPath and PfxPassword to provide the path to the .pfx file and its password.
JSON as Field Value
Here is how you can pass a JSON value for a field:
{
    {
      "Name": "jsonText",
      "ContentType":"text/json",
      "Value": {
        "One":"Value1",
        "Two":123
      }
    },
    ...
}
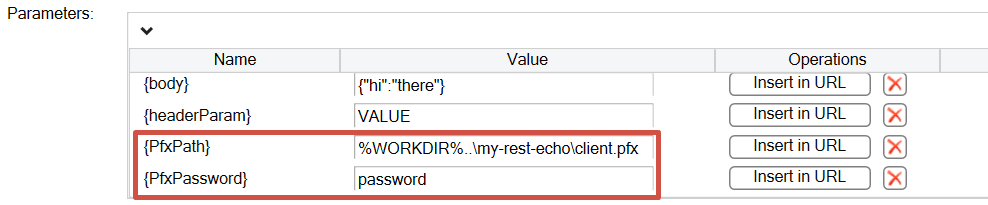
Params in Multipart Request
It is typical to parameterize text values or file paths. It is important to ensure that you properly quote custom values. I.e.:
If you have a parameterized JSON Body:
{
  "multipart": [
    {
      "Name": "jsonText",
      "ContentType":"text/json",
      "Value": {StringParam}
    },
    {
      "Name": "uploadfile",
      "FilePath": {FilePathParam}
    }
  ]
}
Once parameters are defined for the multipart request, ensure they are properly escaped. Consider using JSON.stringify appropriately, i.e.:
RestMultipart_UploadFileParams.SetParameter('StringParam', JSON.stringify("Some Value"));
RestMultipart_UploadFileParams.SetParameter('FilePathParam', JSON.stringify( Global.GetFullPath('NewAvatarImage.png') ));
Passing Data Between API Calls
There are certain scenarios where it is convenient to pass dynamic data into a REST call or between subsequent REST calls, such as:
- You might want to use credentials from an external configuration file to avoid hard-coding them as REST headers or parameters.
- One call returns values needed by subsequent calls. A good example is a bearer token returned by authorization calls, which should then be used as a header in all subsequent calls. The token has a short lifespan and should be requested repeatedly between testing sessions.
- You might want to test a service in exploratory mode. That is, perform a sequence of calls manually. Perhaps then check something via the UI or get a value that is easier to obtain via the API and then needed elsewhere.
Therefore, we enabled pre- and post-request callbacks that work in both the REST editor and during runtime when tests execute API calls. We call them **Before**Request and **After**Response.
Before-Request and After-Response REST Callbacks.
Callbacks are defined in the REST editor.
Request-specific callbacks can be defined in the properties editor when an action is selected:
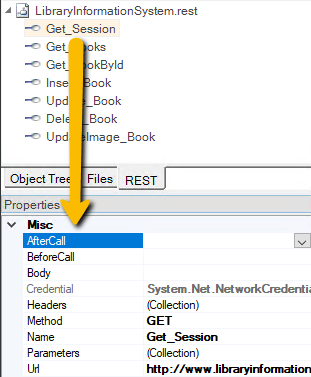
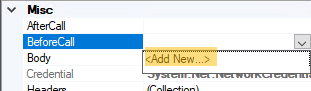
When a callback is required, it can either be selected from the dropdown or generated using the <Add New...> option:
Callback functions are always created in the User.js file of the current test.
BeforeRequest REST Callback
The BeforeRequest callback has the following signature:
function Before_<Rest_FileName>_<Entry_Name>(/**RESTRequest*/request)
For example:
function Before_LibraryInformationSystem_Get_Session(/**RESTRequest*/request)
{
    request.SetHeader('Accept', 'application/json');
    request.SetHeader('Content-Type', 'application/json');
    request.SetCredential('librarian', 'librarian');
}
It is executed immediately before the action. It can access and alter the pre-defined Headers, Properties, and URL of the given request. This can be done by accessing the global Session object and the request object passed as a parameter. The parameter type is RESTRequest.
AfterResponse REST Callback
The AfterResponse callback has the following signature:
function After_<Rest_FileName>_<Entry_Name>(/**RESTResponse*/response)
For example:
function After_LibraryInformationSystem_Get_Session(/**RESTResponse*/response)
{
    var sessionid = response.GetResponseBodyObject();
    Session.SetParameter('session_id', sessionid);
}
It is executed immediately after the action. It can access the response object passed as a parameter. The parameter type is RESTResponse.
Common REST Callbacks
Sometimes it is more convenient to define a single common callback that will be executed for all requests within a given endpoint.
Common callbacks are defined in the property window for the entire endpoint.
When both a common callback and an entry callback are defined, both are executed in the following order:
- Common Before_Rest_FileName
- Before_Rest_FileName_Entry_Name
- Send *request* and get *response*
- After_Rest_FileName_Entry_Name
- Common After_Rest_FileName
REST Callback Limitations
If a given request has no explicit callback defined and no common callback defined, then in REST Editor mode, Session values will be ignored. If you have important parameters or headers stored in the session, it is recommended to define a common 'Before' callback.
REST Callback Session
Once a request has a callback and is executed from the Editor, a debugger session starts and keeps running. You can see this by the presence of the debugger panel:

All variables and session parameters assigned in the callbacks remain active while the debugger panel is running.
If you want to modify the callback code, you need to use the Stop Debugger or Reset button first to save the modifications. In this case, variables, session parameters, and collected cookies are lost.
REST Callback Breakpoints
You can set a breakpoint in any REST callback function, and Rapise will stop when making a call. If your function is long and debugging implies many steps, the request may proceed while you are debugging. To avoid this, you can change the value of the global option API Callback Timeout.
Recording
The way Rapise records captured REST actions may differ depending on the API recording options.
When Record REST Objects is true, each step creates an object in the object tree:
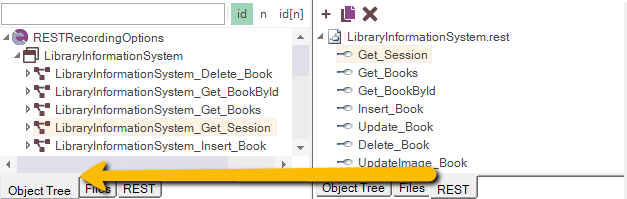
and is used by the produced script:
    var LibraryInformationSystem_Get_Session=SeS('LibraryInformationSystem_Get_Session');
    LibraryInformationSystem_Get_Session.DoExecute();
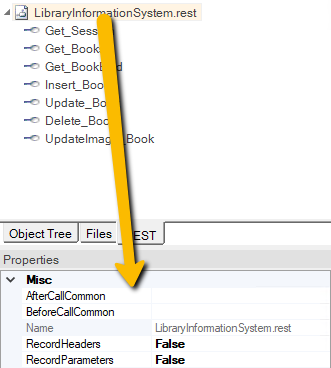
When Record REST Objects is false, nothing is added to the object tree, and the generated script uses the REST definition file directly by means of Session.GetRESTRequest:
    var LibraryInformationSystem_Get_Session =/**RESTService*/Session.GetRESTRequest("LibraryInformationSystem.rest", "Get_Session");
    LibraryInformationSystem_Get_Session.DoExecute();
When Generate Full Name is false, a shorter object name is used, both when Record REST Objects is true:
    var Get_Session=SeS('Get_Session');
    Get_Session.DoExecute();
and when Record REST Objects is false:
    var Get_Session =/**RESTService*/Session.GetRESTRequest("LibraryInformationSystem.rest", "Get_Session");
    Get_Session.DoExecute();
How Session.GetRESTRequest is recorded depends on Generate Short REST Path. In short mode, the first parameter is just <filename>.rest, i.e.:
Session.GetRESTRequest("LibraryInformationSystem.rest", "Get_Session");
While in long mode, it is:
Session.GetRESTRequest("%WORKDIR%\\LibraryInformationSystem.rest", "Get_Session");
Negative REST Tests
Some actions are expected to return failures, and you might need to work with them to produce negative tests. There are two ways to do this. First is global, where failures of all actions are ignored. It is active when you choose Session.SetIgnoreStatus. For example:
Session.SetIgnoreStatus(true);
FailingEndpoint1.DoExecute();
PassingEndpoint.DoExecute();
FailingEndpoint2.DoExecute();
Session.SetIgnoreStatus(false);
If automatic status verification is disabled, you are expected to explicitly check the response returned from DoExecute.
Record Failed REST Actions controls what to record when an action returns a status other than 200. If it is true, the recorded step has an additional parameter ignoreStatus=true. This flag is only added when the action also failed during recording.
FailingEndpoint1.DoExecute({}, true);
PassingEndpoint.DoExecute();
FailingEndpoint2.DoExecute({}, true);