Dynamics NAV
Overview
In this guide, we describe how to create robust tests for the Dynamics NAV desktop client using Rapise.
Microsoft Dynamics NAV is an enterprise resource planning (ERP) software suite for midsize organizations. The system offers specialized functionality for manufacturing, distribution, government, retail, and other industries.
Dynamics NAV Web Client Testing Note
Dynamics 365 Business Central is the successor to the Dynamics NAV 2017 Web Client. Both solutions were built by Microsoft using the same technology, though they have a few differences. Rapise includes the DomDynamicsNAV library, which makes recording and playback of Dynamics NAV web client tests straightforward. This post will teach you the basics of recording reliable tests for these solutions, as well as methods for troubleshooting test playback. We'll use Dynamics 365 Business Central as the system under test.
Start Recording a New Test
First, you need to create a new Basic test and start a recording session. Choose Dynamics NAV from the list of applications:
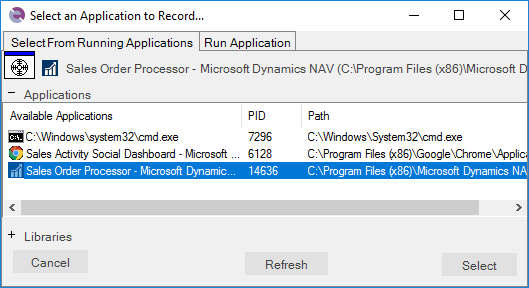
Then, press the Select button to start recording. When recording is complete, you will see that Rapise automatically attached the necessary libraries in the Main.js file:
g_load_libraries=["UIAutomation", "DynamicsNAV"];
-
Microsoft UI Automation is the new accessibility framework for Microsoft Windows, available on all operating systems that support Windows Presentation Foundation (WPF). UI Automation provides programmatic access to most user interface (UI) elements on the desktop, enabling assistive technology products such as screen readers to provide information about the UI to end users and to manipulate the UI by other means than standard input. UI Automation also allows automated test scripts to interact with the UI.
-
The DynamicsNAV library supports a set of controls specific to the Microsoft Dynamics NAV application.
Automatic Adjustment of Window Title Object Property
The main window title of Dynamics NAV is dynamic by nature.

It may contain not only the application name but also the name of the currently active page or information about the currently opened record. Thus, it can be different at the time of test recording and playback. To cope with this problem, Rapise automatically replaces the actual window title with a regular expression. You can see this in the object tree and properties of captured objects.
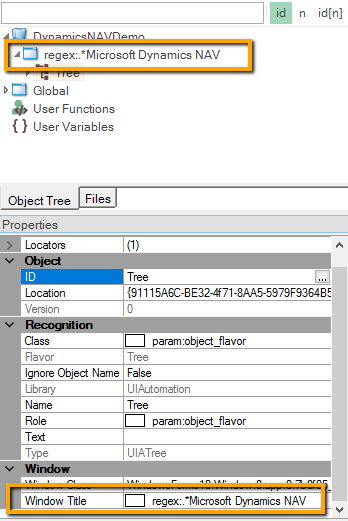
Here it is:
1 | |
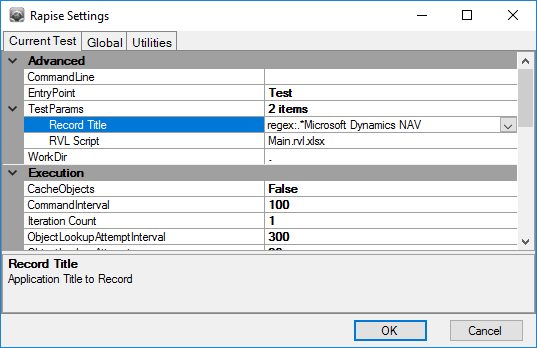
Rapise also adjusts the Record Title in test settings to the same regular expression, so you do not need to choose the Dynamics NAV main window during subsequent recording sessions.
Titles of Child Windows
Child windows of Dynamics NAV may also have dynamic titles.

Rapise tries to generate a regular expression for such titles as well. If it does not, write the expression yourself. But the good news is that you only need to do this for one object in each such window. For subsequently learned objects, Rapise will automatically change the window title property. In other words, when Rapise learns a new object and its window title is matched by a regular expression of a previously learned object, the title property is automatically replaced by this regular expression.
How to Launch Dynamics NAV Client
If in your test you want to check that the Dynamics NAV application is installed and running, place this function into User.js:
function DynamicsNAVLaunch()
{
    function _NavIsRunning()
    {
        var windows = g_util.FindWindows("regex:.*Microsoft Dynamics NAV", "regex:WindowsForms10.*");
        return windows.length > 0;
    }

    if (_NavIsRunning())
    {
        Tester.Message("Dynamics NAV Client is already running");
        return true;
    }

    var fso = new ActiveXObject("Scripting.FileSystemObject");

    var pfFolder = Global.GetSpecialFolderPath("ProgramFilesX86");
    var dynamicsPath = pfFolder + "\\Microsoft Dynamics NAV\\100\\RoleTailored Client\\Microsoft.Dynamics.Nav.Client.exe"
    if(!fso.FileExists(dynamicsPath))
    {
        Tester.Message("Dynamics NAV Client is not installed on this computer");
        return false;
    }

    Global.DoLaunch(dynamicsPath);

    for(var i = 0; i < 60; i++)
    {
        if (_NavIsRunning())
        {
            Tester.Message("Dynamics NAV Client started successfully");
            return true;
        }
        Global.DoSleep(1000);
    }

    Tester.Message("Dynamics NAV Client did not start");
    return false;
}
You can now use this function in RVL:

and in JavaScript:
DynamicsNAVLaunch();
Recording Actions and Learning Objects
During recording, while you interact with Dynamics NAV controls, Rapise captures actions and displays them in the recording dialog.
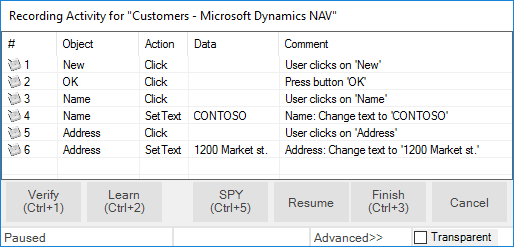
After this recording session, the corresponding UI area looks as follows:
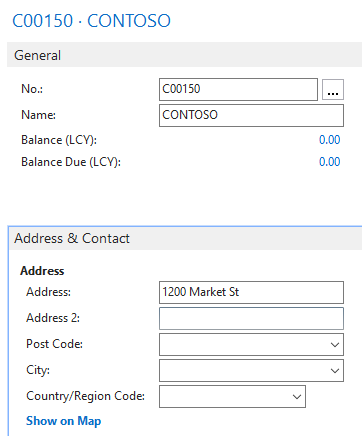
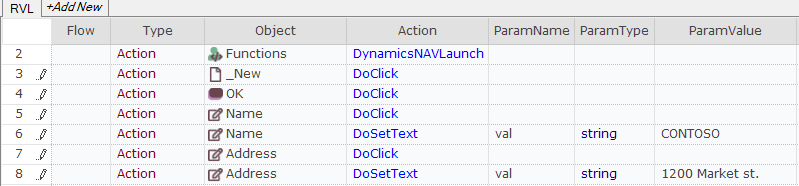
When recording is finished, Rapise automatically generates the test.
In Rapise Visual Language (RVL), it looks like:
In JavaScript:
function Test()
{
    SeS('_New').DoClick();
    SeS('OK').DoAction();
    SeS('Name').DoClick();
    SeS('Name').DoSetText("CONTOSO");
    SeS('Address').DoClick();
    SeS('Address').DoSetText("1200 Market St");
}
If Rapise does not capture any interaction or captures it incorrectly, try to learn the object. In this case, Rapise will add it to the object tree but will not capture the action, and you'll add the code to the test manually later. To learn an object during a recording session, place your mouse cursor over it and press the Ctrl+2 shortcut. It makes sense to pause recording before learning objects. This will prevent Rapise from intercepting mouse and keyboard input and attempting to record your interactions. The Pause/Resume button is located on the right side of the Recording Activity dialog.
Tips for Interacting with Objects
Text Box
To allow Rapise to capture the entered text, interact with a text box in two steps:
- Click into the edit box.
- Type text using the keyboard.
ComboBox
A Dynamics NAV combo box consists of three elements:
- an edit box,
- an open button,
- and a dropdown table.
For reliable recording of combo box interactions, follow these steps:
- Click on the edit box.
- Click on the open button.
- Click on a cell in the table.
Rapise will record this as:
RVL

JavaScript
// Click on the edit box
SeS('City').DoClick);
// Click on the open button
SeS('City1').DoAction();
// Select city in the table, choose "Gmunden" value in the column "City"
SeS('DataGridView').DoClickCell("Gmunden", "City");
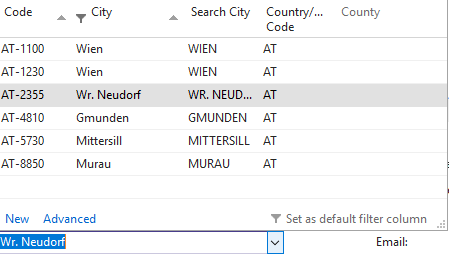
Table
Rapise offers complete support for Dynamics NAV grids/tables. It recognizes Dynamics NAV grids as DynamicsNAVTable objects. Rapise can record user clicks on cells and also provides an API to get the number of rows and columns, and to get column names by index.
When you click on a cell in a table, Rapise records the column name and value in the cell. The generated click step looks like:
RVL

JavaScript
SeS('DataGridView').DoClickCell("Gmunden", "City");
Rapise can click cells based on column name and value, as well as using column and row indexes. Rapise can also read column names, column count, and row count. Check DynamicsNAVTable for more details.
Here is an example of interacting with a grid.
var grid = SeS('DataGridView');

var cell = grid.GetCell(3, "Name");
Tester.Message(cell);

var colValues = grid.GetColumnValues(2, 10);
Tester.Message(colValues.join(','));

grid.DoClickCell("Bilabankinn", "Name");
grid.DoClickColumn(1);
grid.DoClickColumn("Name");

var rowCount = grid.GetRowCount();
Tester.Message(rowCount);

var colCount = grid.GetColumnCount();
Tester.Message(colCount);
for(var i = 0; i < colCount; i++)
{
    var colName = grid.GetColumnName(i);
    Tester.Message("\"" + colName + "\"");
    var colIndex = grid.GetColumnIndex(colName);
    Tester.Message(colIndex);
}
Dynamics NAV Cookbook
Maximize/Minimize/Restore Window
You can maximize a window using any object inside it as a starting point. In the examples below, we will use the object with ID ToolBar.
First, place the following code into your User.js:
function MaximizeWindow(/**objectId*/ objectId)
{
    SeS(objectId).getDesktopWindow().Maximized = true;
}

function MinimizeWindow(/**objectId*/ objectId)
{
    SeS(objectId).getDesktopWindow().Maximized = false;
}

function RestoreWindow(/**objectId*/ objectId)
{
    SeS(objectId).getDesktopWindow().Iconic = false;
}
Now you can use these functions in RVL:

JavaScript
MaximizeWindow("ToolBar");
RestoreWindow("ToolBar");
MinimizeWindow("ToolBar");
Scroll to a Specific Row of a Grid
Generally, Dynamics NAV grids do not allow accessing cells that are not currently visible on screen. Using scrolling, it is possible to make a specific row/column of a grid visible. If you perform a DoClickCell action, Rapise will automatically ensure that the cell is visible on screen. There is also an explicit scroll action: DoScrollTo.
RVL

JavaScript
SeS('CustomerGrid').DoClickCell("Francematic", "Name");
SeS('CustomerGrid').DoScrollTo(30, 7);
See Also
- Microsoft Dynamics
- Get the framework for testing Dynamics NAV (github)
- KB: How to start Dynamics NAV client
- KB: If recording of actions in Dynamics AX or Dynamics NAV does not work
- KB: How to record entering of data into Dynamics NAV tables
- KB: How to ensure that a Fast Tab is expanded and scrolled into view in Dynamics NAV
- Webinar: Testing Microsoft Dynamics NAV with Rapise
- Webinar: Testing MS Dynamics NAV & Robotic Process Automation with Rapise