Do Relative Analog Recording
Let's once again use our trusty over-simplified TwoDialogs sample application to learn how to use analog recording, focusing on its relative mode, and to discover its value as well as the dangers associated with it.
Run the TwoDialogs sample AUT
By default, this will be located at the
1 | |
location.
Create New Test
Start Rapise, create a new test, and name it TwoDialogsAnalogAbsolute.
Start Recording
Click the Record button in the toolbar of Rapise.
Select an Application to Record
When the Select an Application to Record dialog is displayed, select the TwoDialogs.exe application. Ignore the library list, as we will not be using any library for analog recording. Then, click the Select button.
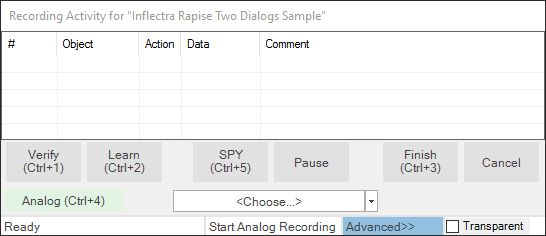
The Recording Activity Dialog
The Recording Activity Dialog appears with an empty grid.
This recording session will be a little different from previous ones. Previously, we could interrupt our object-related recording/learning with other activities. Because Rapise was only recording activity related to the target application, our recording or object learning would be unaffected. However, in analog recording, Rapise monitors the mouse and keyboard across the entire system—for all applications. This means that if you answer an email or log in to a secure system in the middle of analog recording, all steps, including mouse movement and keystrokes, will be recorded. Note, however, that screen contents are not recorded by Rapise.
Bring the Application To Front
If the TwoDialogs UI is hidden, bring it to the foreground so you don't have to search for it when you start recording.
Start Analog Recording
When you're ready to record the session, click the Analog button on the Recording Activity dialog.
Note: The key sequence Ctrl+4 starts an absolute analog recording session. Click the
Analogbutton to start the relative analog recording session.When you click the
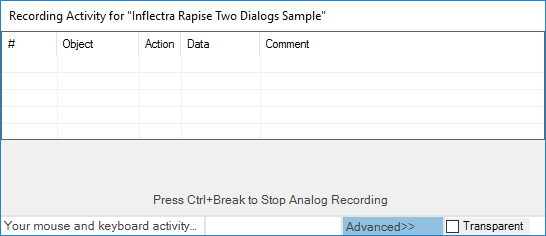
Analogbutton, two things happen. First, the status bar of the Recording Activity dialog will change to display: Click on object to start analog recording.
After the next mouse click, Rapise begins recording all mouse and keyboard activity until you stop. Second, the Recording Activity dialog now indicates that analog recording is in progress and allows you to stop.
Do Analog Recording
Go to the TwoDialogs AUT and click anywhere within the application's window to begin the analog recording.
Click the empty "Please enter your name" text box.
Type a name in the text box.
Press the Tab key or click the left mouse button to move the input focus to the second text box.
Type another name.
Move the mouse pointer to the
OKbutton and click the left mouse button.
Stop Analog Recording
When you have recorded sufficiently, switch to the Analog Recording dialog box and click the Close button or press Ctrl+Break.
Note: If you use the
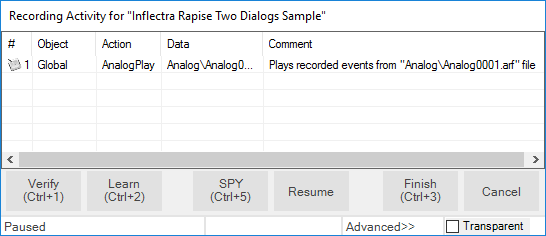
Closebutton on the Analog Recording dialog, the mouse movement to the dialog and the click on theClosebutton will be recorded as part of the analog recording output. This might not be a desirable outcome during playback, because the Analog Recording dialog will not be present, and the mouse click might be replayed in a potentially random location on the screen. For this reason, Ctrl+Break is often a better option for terminating analog recording.Note: The grid will not have an entry added until you end the analog recording with the
Closebutton in the Analog Recording dialog. When you do, an entry will be added to the grid.
Optional Steps
- You can now record additional analog sessions, if desired.
- You can record normal object activity before and/or after the analog recording.
Stop Recording
When you have finished all recording, click the Finish button or press Ctrl+3. Notice that an analog entry is added to the grid.
The Rapise screen will now be restored, and focus will be placed in the editor pane, displaying the TwoDialogsAnalogAbsolute.js script. You should see code similar to the following:
//Plays recorded events from "Analog\\Analog0003.arf" file
SeS('Simulated').DoAnalogPlay("Analog\\\\Analog0003.arf");
Playback
Click the Play button on the Rapise toolbar to play back the recording. Be sure not to interfere with the mouse or keyboard while the recording plays back.
Note: You will see all mouse and keyboard activity reproduced as the analog recording plays. The recording will start from the point where you left-clicked the mouse to begin, and it will end with clicking the
Closebutton in the Analog Recording dialog. If you used Ctrl+Break to end the recording, then the last recorded activity will be that keystroke.
When the analog playback is complete, use the mouse to move the TwoDialogs AUT to a different location on the screen. Play the recording again and observe the operation. The most important thing to realize is that relative analog recording will play back the recording wherever the application is positioned on the screen. This is because you used relative analog recording. Actions performed within the AUT will be faithfully reproduced. However, if the recording includes mouse movements outside the AUT (for example, to terminate the recording using the Analog Recording dialog's Close button), these external movements might not be accurately reproduced during playback if the AUT's position has changed. This is because such mouse motion outside the AUT might be relative to its original screen position or to absolute screen coordinates. Try this for yourself, but be sure to minimize all other applications before starting so you don't cause mouse events that might affect other applications on the screen.