Azure DevOps Integration v2
Tip
This documentation section is deprecated. There is a new way to integrate Rapise and Azure DevOps. Please refer to Azure DevOps Integration v3.
This topic explains how to run Rapise tests with Node-Tap and Azure DevOps.
Node-Tap
Prerequisites
Download and install Node.js. Open a command prompt and run the following commands to ensure you have Node.js and npm installed:
C:\Users\inflectra>node --version
v10.16.3

C:\Users\inflectra>npm --version
6.9.0
Node-Tap package using npm:
npm install tap -g
C:\Users\inflectra>npm list tap -g
C:\Users\inflectra\AppData\Roaming\npm
-- tap@14.6.9
NODE_PATH and set its value to the node_modules subfolder. In our example, this is:
C:\Users\inflectra\AppData\Roaming\npm\node_modules
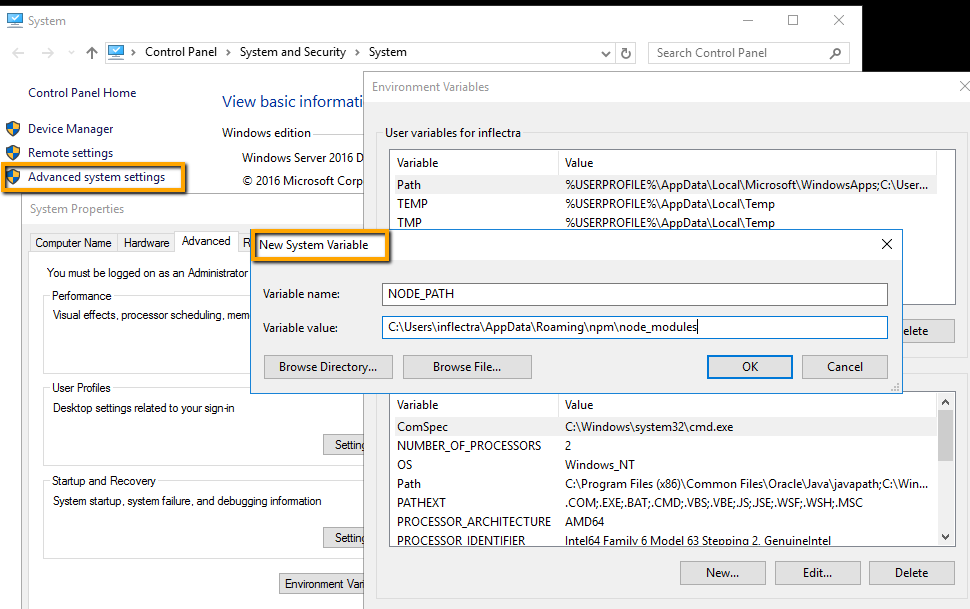
Relaunch the Command Prompt and verify the system variable:
C:\Users\inflectra>echo %NODE_PATH%
C:\Users\inflectra\AppData\Roaming\npm\node_modules
Test Framework
As a starting point, you can use the sample framework we published on GitHub.
The framework's root folder contains the following:
rapise.js- a Node.js module that can run Rapise tests;runtest.cmd- a command file used byrapise.js; adjust theSES_ENGINE_HOMEvariable in this file if needed;fixunit.js,tap2xunit.cmd- these two files convert execution results from TAP format to XUnit format, which is accepted by Azure DevOps.
Each Rapise test within this framework resides in a direct subfolder of the root folder:
AzureDevopsFriendlyArchitecture
|
|-CreateNewBook
|-FailedLogin
The test folder contains entries for Node-Tap. These are files with predefined content, and their names match those of the Rapise tests.
AzureDevOpsFriendlyArchitecture
|
|- test
    |
    |-CreateNewBook.js
    |-FailedLogin.js
The predefined content of these files is:
var rapise = require('../rapise')
var tap = require('tap')
var path = require('path');

var testName = path.basename(__filename);

rapise.run(testName, function(exit_code) {
    tap.ok(exit_code == 0, testName);
})
The tests folder also contains tap-parallel-not-ok, which instructs Node-Tap to run tests sequentially.
Run Tests with Tap
To run tests on a local machine, open a command prompt in the framework's root folder and execute:
tap

To pass parameters to a Rapise test, specify --test-arg. The value should be a JSON stringified object. Every property of this object will be evaluated by Rapise as a global variable:
tap --test-arg="{'g_browserLibrary':'Selenium - Chrome'}"
Azure DevOps Pipeline v1
To run tests in Azure DevOps, you need to configure a pipeline. Here is the template for running Rapise tests:
azure-pipelines.yml
# Starter pipeline
# Start with a minimal pipeline that you can customize to build and deploy your code.
# Add steps that build, run tests, deploy, and more:
# https://aka.ms/yaml

trigger:
- master

pool:
  name: 'default'

steps:

- script: |
    echo Running tests...
    tap --test-arg="{'g_browserLibrary':'Selenium - Chrome'}"
  displayName: 'Execute Tests'
  continueOnError: true

- script: |
    call tap2xunit.cmd
  displayName: "Convert TAP to XUnit"

- script: |
    cscript.exe fixunit.js
  displayName: 'Fix XUnit Reports'

- task: CopyFiles@2
  inputs:
    contents: 'reports/**'
    targetFolder: $(Build.ArtifactStagingDirectory)

- task: PublishBuildArtifacts@1
  inputs:
    pathToPublish: $(Build.ArtifactStagingDirectory)
    artifactName: TestRunReports

- task: PublishTestResults@2
  inputs:
    testResultsFormat: 'JUnit'
    testResultsFiles: 'results/*.xml'
    testRunTitle: 'Basic Tests'
    failTaskOnFailedTests: true
The pipeline above assumes that the default agent pool contains a Self-hosted Windows Agent installed on a machine with Rapise and Node-Tap (see Prerequisites).
See the video to learn how to install and configure a self-hosted agent.
The pipeline consists of the following steps:
- Run tests via the
tapcommand. You can pass parameters if needed. - Convert TAP-formatted execution results to XUnit-formatted reports.
- Adjust XUnit reports for improved processing by Azure DevOps.
- Gather logs and reports in TAP/TRP formats in the
reportsfolder for the Publish Build Artifacts task. - Upload test results to Azure using the Publish Test Results task.
After the pipeline executes, you can review test results:

and reports/logs (.tap, .trp, .log files):

Note: TRP files are standard reports you can view with Rapise.
Azure DevOps Pipeline v2
If you do not want each step of a Rapise test to be reported as a test case in Azure DevOps, use the modified pipeline version:
azure-pipelines-summary.yml
# Starter pipeline
# Start with a minimal pipeline that you can customize to build and deploy your code.
# Add steps that build, run tests, deploy, and more:
# https://aka.ms/yaml

trigger: none

pool:
  name: 'default'

steps:

- script: |
    echo Running tests...
    tap --no-coverage --test-arg="{'g_browserLibrary':'Chrome HTML'}"
  displayName: 'Execute Tests'
  continueOnError: true

- script: |
    call tap2xunit.cmd
  displayName: "Convert TAP to XUnit"

- script: |

    .exe summarize.js
  displayName: 'Fix XUnit Reports'

- task: CopyFiles@2
  inputs:
    contents: 'reports/**'
    targetFolder: $(Build.ArtifactStagingDirectory)

- task: PublishBuildArtifacts@1
  inputs:
    pathToPublish: $(Build.ArtifactStagingDirectory)
    artifactName: TestRunReports

- task: PublishTestResults@2
  inputs:
    testResultsFormat: 'JUnit'
    testResultsFiles: 'results/*.xml'
    testRunTitle: 'Basic Tests'
    failTaskOnFailedTests: true
summarize.js to adjust the XUnit reports. The Azure DevOps report for this pipeline looks like this:

Detailed logs and reports (.tap, .trp, .log files) are also available for download as a ZIP archive:
Note: TRP files are standard reports you can view with Rapise.